# 常见问题
# 如何新增系统图标
如果你没有在本项目 Icon (opens new window) 中找到需要的图标,可以到 iconfont.cn (opens new window) 上选择并生成自己的业务图标库,再进行使用。或者其它 svg 图标网站,下载 svg 并放到文件夹之中就可以了。
下载完成之后将下载好的 .svg 文件放入 @/icons/svg 文件夹下之后就会自动导入。
使用方式
<svg-icon icon-class="password" /> // icon-class 为 icon 的名字
提示
菜单图标会自动引入@/icons/svg,放入此文件夹中图标就可以选择了
# 如何不登录直接访问
方法1:在SecurityConfig.java中设置httpSecurity配置匿名访问
// 使用 permitAll() 方法所有人都能访问,包括带上 token 访问
.antMatchers("/admins/**").permitAll()

// 使用 anonymous() 所有人都能访问,但是带上 token 访问后会报错
.antMatchers("/admins/**").anonymous()
2
3
4
5
方法2:在对应的方法或类上面使用@Anonymous注解。
// 类上定义匿名注解,作用于所有的方法
@Anonymous
@RestController
@RequestMapping("/system/xxxx")
public class SysXxxxController extends BaseController
{
}

// 方法定义匿名注解,作用于单独的方法
@Anonymous
@GetMapping("/list")
public List<SysXxxx> list(SysXxxx xxxx)
{
    return xxxxList;
}
2
3
4
5
6
7
8
9
10
11
12
13
14
15
警告
匿名访问的方法上面@PreAuthorize权限注解也需要去掉,因为已经使用匿名访问了,权限自然也不需要去验证了。
前端不登录如何直接访问
如果是前端页面可以在src/permission.js配置whiteList属性白名单即可。
# 如何更换项目包路径
# 业务模块访问出现404
# 如何使用多数据源
# 如何更换主题皮肤
默认的主题都是深色主题,如果需要其他主题可以做如下配置。
1、点击顶部最右侧个人中心头像,选择布局设置,选择主题风格设置。(局部设置)
2、在ruoyi-ui\src\settings.js,设置侧边栏主题sideTheme为theme-xxxx。(全局设置)
# 移除或自定义首页
默认登录是指向index首页仪表盘。如果想移除或修改,可以参考以下步骤。
1、打开router/index.js文件,找到首页路由配置并将改为自定义页面:
// {
//   path: '',
//   component: Layout,
//   redirect: 'index',
//   children: [
//     {
//       path: 'index',
//       component: () => import('@/views/index'),
//       name: 'Index',
//       meta: { title: '首页', icon: 'dashboard', affix: true }
//     }
//   ]
// },

{
    path: '',
    component: Layout,
    redirect: '/system/user',
},
2
3
4
5
6
7
8
9
10
11
12
13
14
15
16
17
18
19
2、修改login.vue文件,去掉redirect参数
// this.$router.push({ path: this.redirect || "/" }).catch(()=>{});
this.$router.push({ path: "/" }).catch(()=>{});
2
3、打开Breadcrumb/index.vue文件,删除或注释首页判断代码
//  // 判断是否为首页
//  if (!this.isDashboard(matched[0])) {
//    matched = [{ path: "/index", meta: { title: "首页" } }].concat(matched)
//  }
2
3
4
4、修改TagsView/index.vue文件,对最后一个标签限制删除
closeSelectedTag(view) {
  if (this.visitedViews.length == 1) {
	  this.$modal.msgWarning("当前为最后一个页签,不允许删除。");
	  return;
  }
  ....
},
2
3
4
5
6
7
# 如何实现动态菜单
有时候经常会需要将系统的某个菜单打开多个相同的明细页,大多数据情况是配置在router/index.js中实现,如下
  {
    path: '/system/dict-data',
    component: Layout,
    hidden: true,
    permissions: ['system:dict:list'],
    children: [
      {
        path: 'index/:dictId(\\d+)',
        component: () => import('@/views/system/dict/data'),
        name: 'Data',
        meta: { title: '字典数据', activeMenu: '/system/dict' }
      }
    ]
  },
2
3
4
5
6
7
8
9
10
11
12
13
14
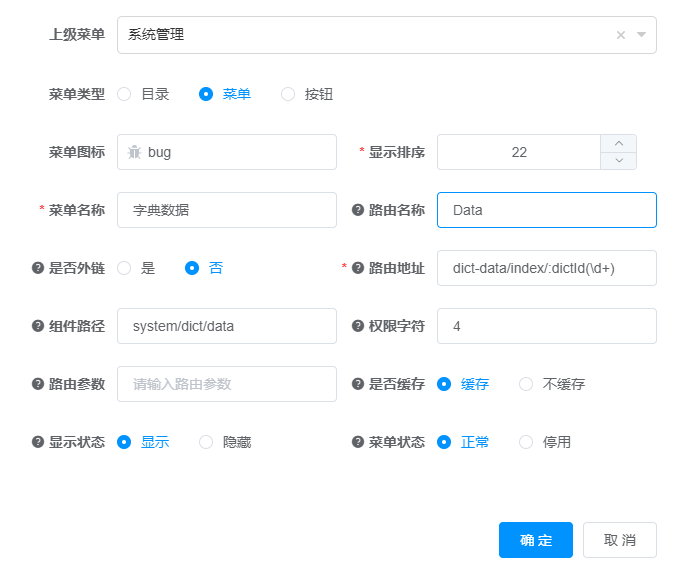
如果遇到需要经常修改的情况,那么就不宜直接写死静态路由,这个时候我们就可以在菜单管理中配置动态路由。
针对上述的情况,我们可以在菜单管理中新增配置以实现动态路由的效果。
其中关键属性,路由名称为Data,路由地址为dict-data/index/:dictId(\d+),组件路径为system/dict/data,达到的效果是和上述静态路由配置是一致的。
# 如何使用横向菜单
默认的导航菜单都是在左侧,如果需要横向导航菜单可以做如下配置。
1、点击顶部最右侧个人中心头像,选择布局设置,开启TopNav。(局部设置)
2、在ruoyi-ui\src\settings.js,设置是否显示顶部导航topNav为true。(全局设置)
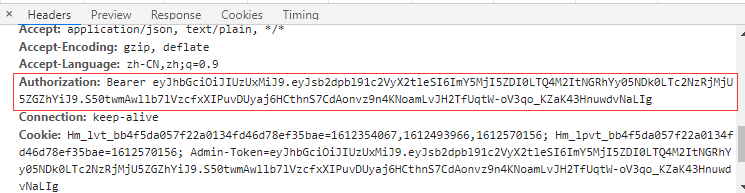
# 系统接口访问出现401
在测试系统接口中可能存在一些接口用到用户信息或权限验证,此时需要添加全局的token参数。如图
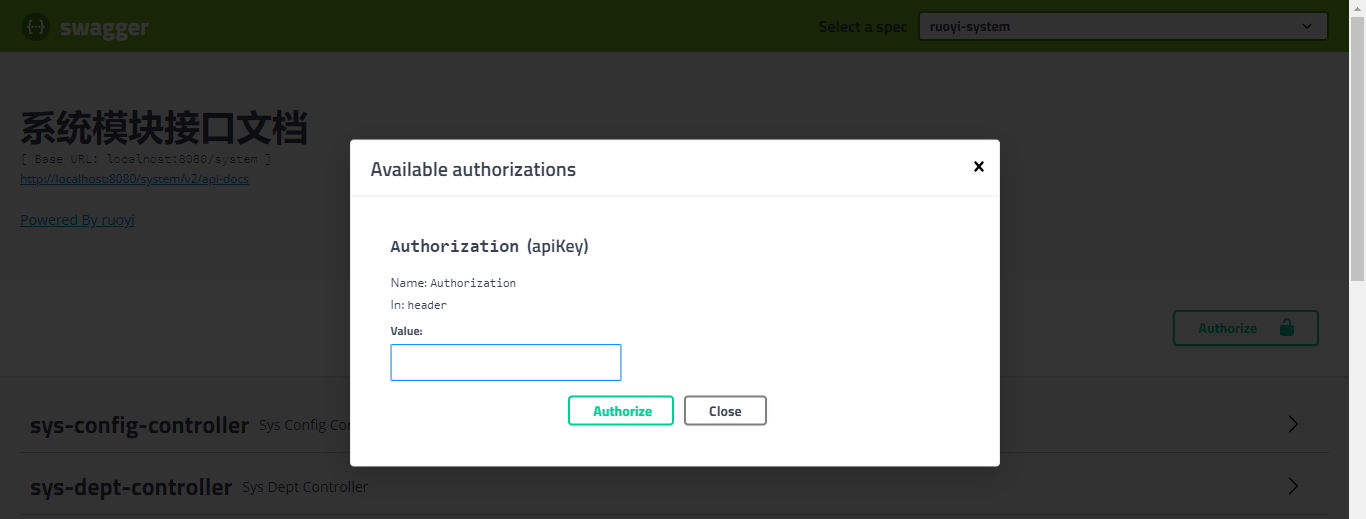
token是在登录成功后返回的,可以在浏览器通过F12查看Network中的请求地址,对应参数Authorization。复制截图内容到swagger全局Authorization属性value参数中,点击Authorize,以后每次访问接口会携带此token信息。
# 如何更换后端请求地址
在vue.config.js中,修改target值为对应的的后端接口地址。
devServer: {
  ...,
  proxy: {
    [process.env.VUE_APP_BASE_API]: {
      target: `http://localhost:8080`,
      ...
    }
  },
  ...
},
2
3
4
5
6
7
8
9
10
RuoYi-Vue3版本更换方式
在vite.config.js中,修改target值为对应的的后端接口地址。
server: {
  ...,
  proxy: {
	'/dev-api': {
	  target: 'http://localhost:8080',
	  ...
	}
  }
},
2
3
4
5
6
7
8
9
# 如何启动项目https协议
通常情况下,在启动本地项目时,默认都是http协议,但是有时候测试网站要求我们的协议是https,那么可以配置vue.config.js中的devServer,让其在启动项目的时候,默认是https协议。
module.exports = {
    ......
	devServer: {
	  https: true,
	  ......
	},
}
2
3
4
5
6
7
# 如何获取用户登录信息
- 第一种方法
// 获取当前的用户名称
String username = SecurityUtils.getUsername();
2
2、缓存获取当前用户信息
@Autowired
private TokenService tokenService;

LoginUser loginUser = tokenService.getLoginUser();
// 获取当前的用户名称
String username = loginUser.getUsername();
2
3
4
5
6
3、vue中获取当前用户信息
// 获取用户名和用户ID
const userid = this.$store.state.user.id;
const username = this.$store.state.user.name;
2
3
RuoYi-Vue3版本获取方式
import useUserStore from '@/store/modules/user'

const userid = useUserStore().id;
const username = useUserStore().name;
2
3
4
# 提示您没有数据的权限
这种情况都属于权限标识配置不对在菜单管理配置好权限标识(菜单&按钮)
- 确认此用户是否已经配置角色
- 确认此角色是否已经配置菜单权限
- 确认此菜单权限标识是否和后台代码一致
- 例如参数配置查询权限
1、后台Controller配置@PreAuthorize("@ss.hasPermi('system:config:query')")注解
2、前端菜单管理/参数设置/参数查询权限字符应为system:config:query权限
注:如果是角色权限,应在前端角色管理配置对应角色的权限字符,后台使用@PreAuthorize("@ss.hasRole('admin')")注解
# 如何创建新的菜单页签
Vue设置路由跳转的两种方法
一、路由跳转router.push
// 字符串
router.push('apple')
// 对象
router.push({path:'apple'})
// 命名路由
router.push({name: 'applename'})
//直接路由带查询参数query,地址栏变成 /apple?color=red
router.push({path: 'apple', query: {color: 'red' }})
// 命名路由带查询参数query,地址栏变成/apple?color=red
router.push({name: 'applename', query: {color: 'red' }})
//直接路由带路由参数params,params 不生效,如果提供了 path,params 会被忽略
router.push({path:'applename', params:{ color: 'red' }})
// 命名路由带路由参数params,地址栏是/apple/red
router.push({name:'applename', params:{ color: 'red' }})
// 其他方式
this.$router.push({ path: "/system/user" });
2
3
4
5
6
7
8
9
10
11
12
13
14
15
16
二、动态赋值<router-link :to="...">,to里的值可以是一个字符串路径,或者一个描述地址的对象。例如:
// 字符串
<router-link to="apple"> to apple</router-link>
// 对象
<router-link :to="{path:'apple'}"> to apple</router-link>
// 命名路由
<router-link :to="{name: 'applename'}"> to apple</router-link>
//直接路由带查询参数query,地址栏变成 /apple?color=red
<router-link :to="{path: 'apple', query: {color: 'red' }}"> to apple</router-link>
// 命名路由带查询参数query,地址栏变成/apple?color=red
<router-link :to="{name: 'applename', query: {color: 'red' }}"> to apple</router-link>
//直接路由带路由参数params,params 不生效,如果提供了 path,params 会被忽略
<router-link :to="{path: 'apple', params: { color: 'red' }}"> to apple</router-link>
// 命名路由带路由参数params,地址栏是/apple/red
<router-link :to="{name: 'applename', params: { color: 'red' }}"> to apple</router-link>
// 其他方式
<router-link :to="'/system/user/' + scope.row.userId" class="link-type">
  <span>{{ scope.row.userId }}</span>
</router-link>
2
3
4
5
6
7
8
9
10
11
12
13
14
15
16
17
18
# 如何登录页面携带参数
有时候在未登录时需要访问需要登录的资源,并且需要在登录成功后传递请求参数。
// Vue2 版本的请求方式
http://localhost/system/user?id=123456&version=387
2
// Vue3 版本的请求方式
http://localhost/login?redirect=system/user&id=123456&version=387
2
# 如何手动配置路由传参
第一种:使用path来匹配路由,然后通过query来传递参数,这种情况下query传递的参数会显示在url后面会跟?id=
this.$router.push({
    path: '/user/profile',
    query: {
      id: id
    }
})
2
3
4
5
6
获取参数方式:this.$route.query.id
第二种:使用name来匹配路由,使用params传参,可以在路由的path里加参数。
this.$router.push({
    name: 'UserProfile',
    params: {
      id: id
    }
})
2
3
4
5
6
获取参数方式:this.$route.params.id
第三种:直接让路由携带参数跳转
this.$router.push({
  path: '/user/profile/:id(\\d+)'
})
2
3
获取参数方式:this.$route.params.id
# 如何菜单配置路由传参
在菜单管理中选择菜单类型为菜单,填写对应的路由参数,如:{"id": 1, "name": "ry"}
在自己的组件中获取参数方式:this.$route.query.id,this.$route.query.name
外链可以通过原生方式设置
例如:http://ruoyi.vip?id=1&name=ry
# 如何动态修改页签名称
可以使用tagsView/updateVisitedView动态修改名称,示例如下。
const id = row.id;
const title = '自定义标题'
const route = Object.assign({}, this.$route, { title: `${title}-${id}` })
this.$store.dispatch('tagsView/updateVisitedView', route)
2
3
4
此时页签名称会被修改成自定义标题-{id}
# 如何实现路由的懒加载
在单页应用中,进入首页时,如果需要加载的内容过多,延时过长,不利于用户体验,而运用懒加载则可以将页面进行划分,需要的时候加载页面,可以有效的分担首页所承担的加载压力,减少首页加载用时。
静态路由懒加载方式,自定义在router\index.js
{
  path: '/xxxx',
  name: 'xxxx',
  component: () => import('@/views/xxxx')
}
2
3
4
5
6
动态路由懒加载方式,在store\modules\permission.js修改成import方式
export const loadView = (view) => {
  if (process.env.NODE_ENV === 'development') {
    return (resolve) => require([`@/views/${view}`], resolve)
  } else {
    // 使用 import 实现生产环境的路由懒加载
    return () => import(`@/views/${view}`)
  }
}
2
3
4
5
6
7
8
提示
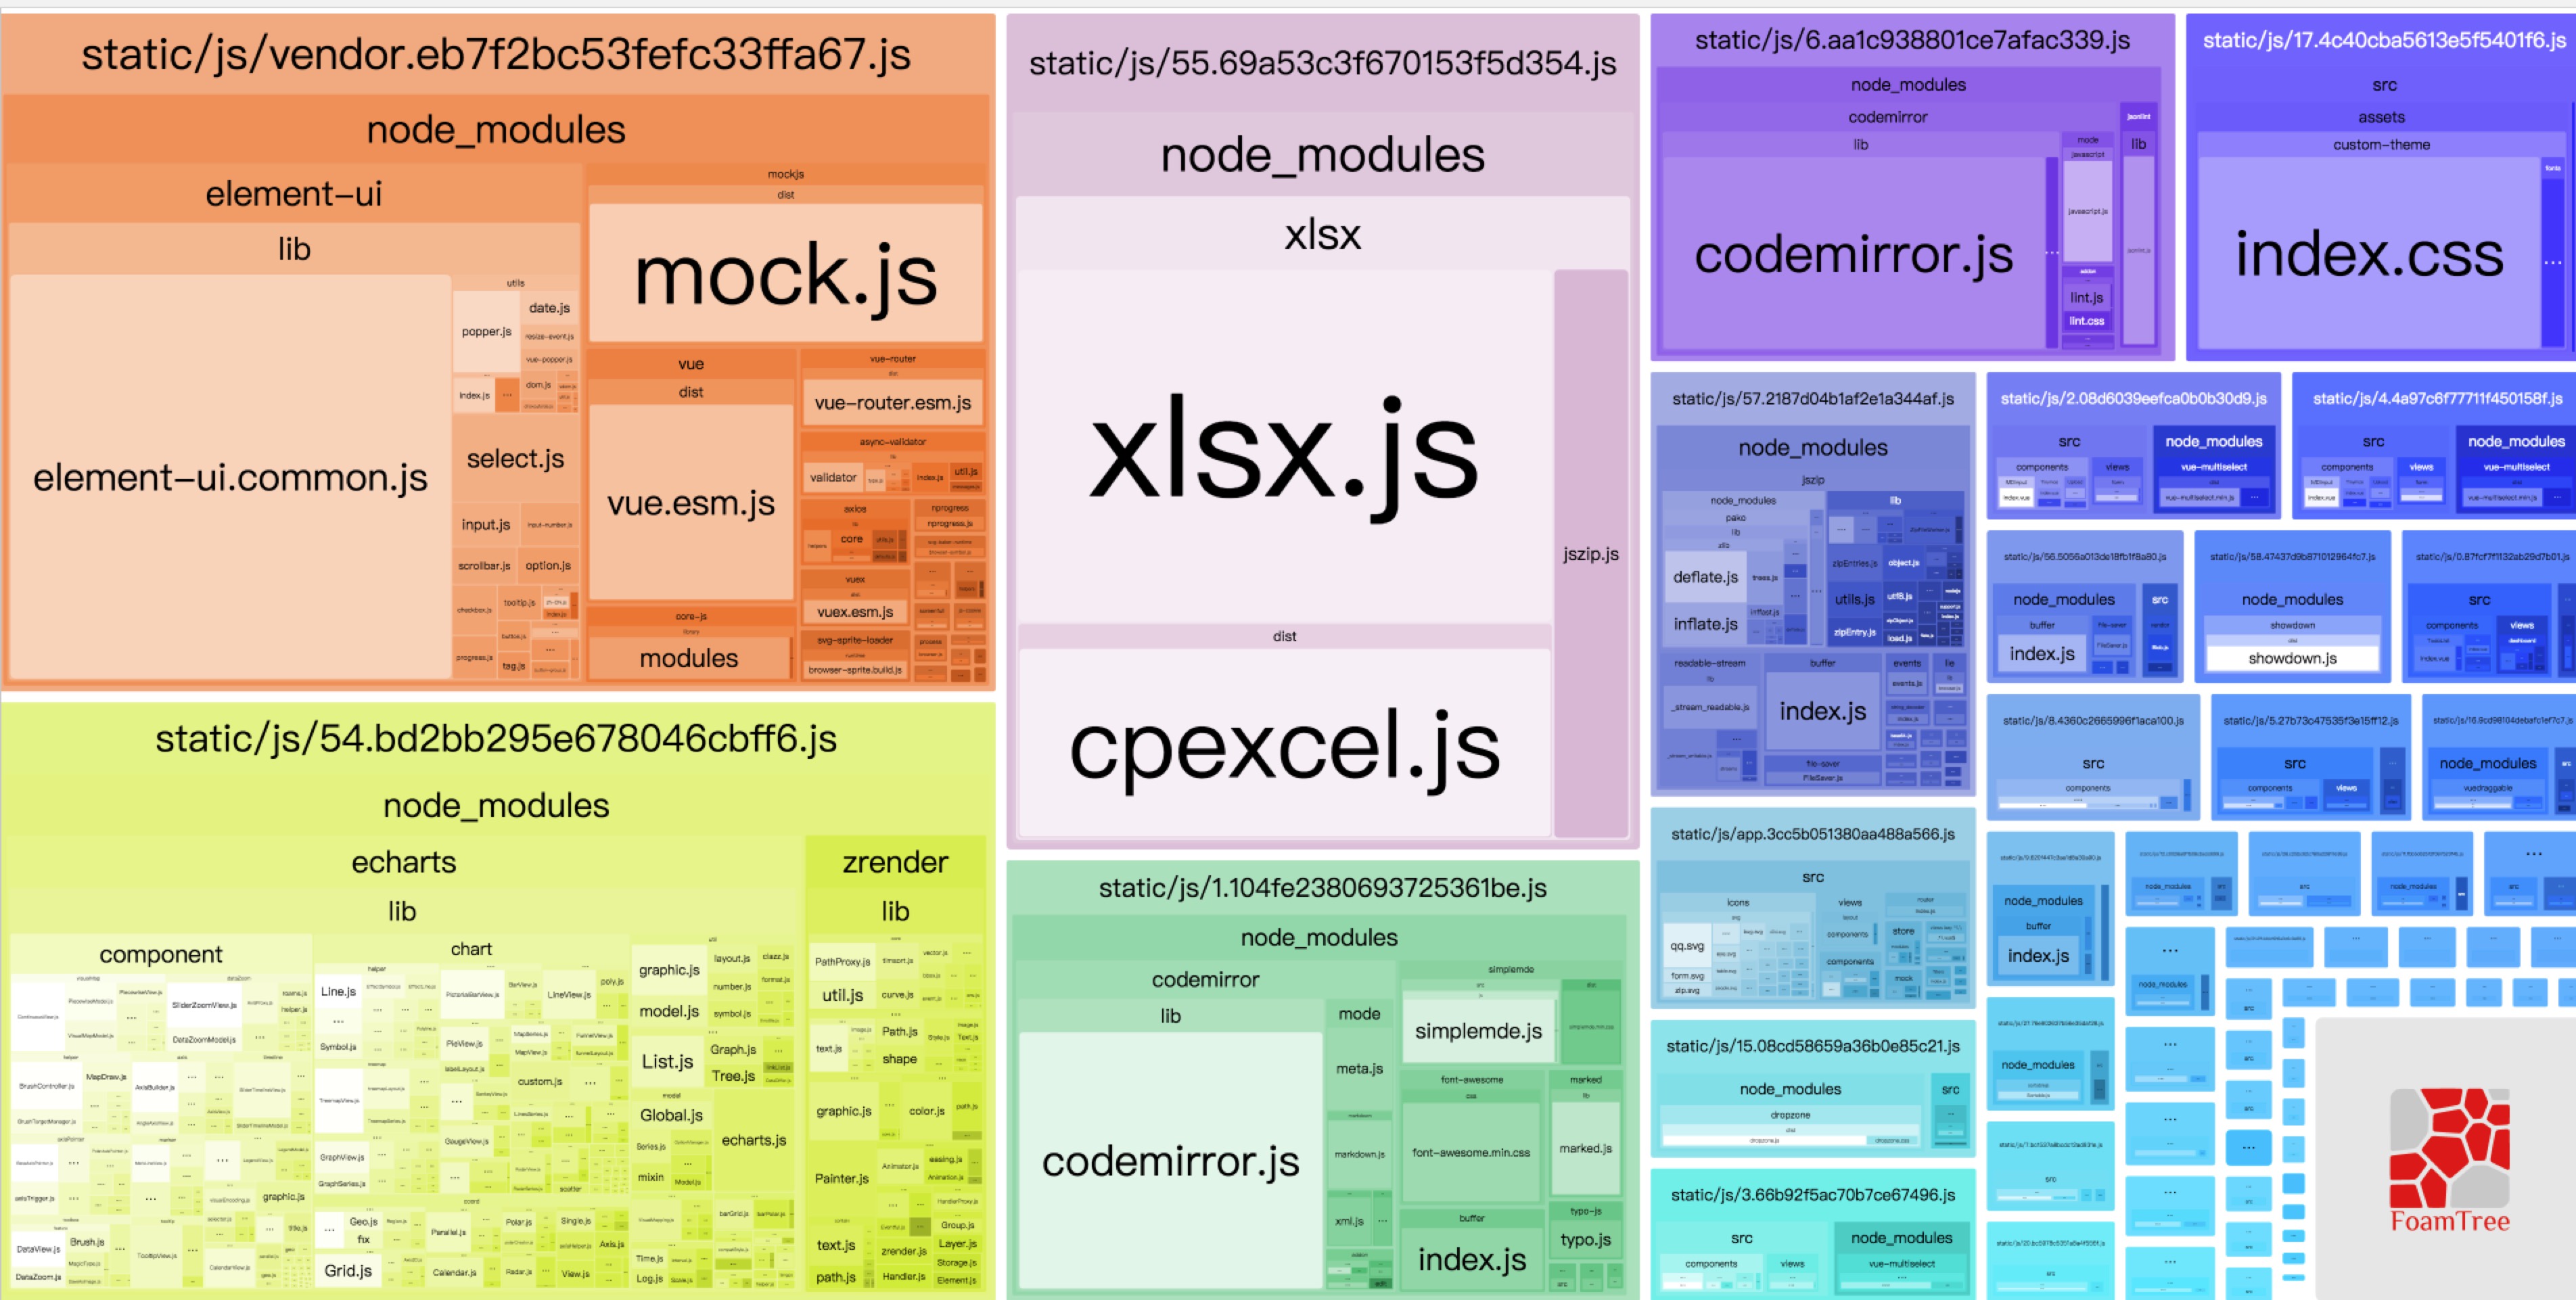
使用npm run build命令打包后会在dist\static\js目录按模块生成对应的js文件。
PS:如果是其他的打包命令也需要懒加载,如npm run build:stage,则在对应的.env.staging新增BABEL_ENV属性指定production即可。
# 页面标题
VUE_APP_TITLE = 若依管理系统

BABEL_ENV = production

NODE_ENV = production

# 测试环境配置
ENV = 'staging'

# 若依管理系统/测试环境
VUE_APP_BASE_API = '/stage-api'
2
3
4
5
6
7
8
9
10
11
12
13
# 如何使用表格显隐列
1、使用插件right-toolbar,设置需要显示/隐藏的列属性columns
<el-row :gutter="10" class="mb8">
  ....
  <right-toolbar :showSearch.sync="showSearch" @queryTable="getList" :columns="columns"></right-toolbar>
</el-row>
2
3
4
2、定义显示列信息,支持两种格式(二选一)推荐对象格式
列显隐(对象格式)
// 列属性信息(对象格式)
columns: {
  userId: { label: '用户编号', visible: true },
  userName: { label: '用户名称', visible: true },
  nickName: { label: '用户昵称', visible: true },
  deptName: { label: '部门', visible: true },
  phonenumber: { label: '手机号码', visible: true }
},
2
3
4
5
6
7
8
// 加入key属性 和v-if判断
<el-table v-loading="loading" :data="userList" @selection-change="handleSelectionChange">
  <el-table-column label="用户编号" align="center" key="userId" prop="userId" v-if="columns.userId.visible" />
  <el-table-column label="用户名称" align="center" key="userName" prop="userName" v-if="columns.userName.visible" :show-overflow-tooltip="true" />
  <el-table-column label="用户昵称" align="center" key="nickName" prop="nickName" v-if="columns.nickName.visible" :show-overflow-tooltip="true" />
  <el-table-column label="部门" align="center" key="deptName" prop="dept.deptName" v-if="columns.deptName.visible" :show-overflow-tooltip="true" />
  <el-table-column label="手机号码" align="center" key="phonenumber" prop="phonenumber" v-if="columns.phonenumber.visible" width="120" />
  ......
</el-table>
2
3
4
5
6
7
8
9
列显隐(数组格式)
// 列信息(数组格式)
columns: [
  { key: 0, label: `用户编号`, visible: true },
  { key: 1, label: `用户名称`, visible: true },
  { key: 2, label: `用户昵称`, visible: true },
  { key: 3, label: `部门`, visible: true },
  { key: 4, label: `手机号码`, visible: true }
],
2
3
4
5
6
7
8
// 加入key属性 和v-if判断
<el-table v-loading="loading" :data="userList" @selection-change="handleSelectionChange">
  <el-table-column type="selection" width="50" align="center" />
  <el-table-column label="用户编号" align="center" key="userId" prop="userId" v-if="columns[0].visible" />
  <el-table-column label="用户名称" align="center" key="userName" prop="userName" v-if="columns[1].visible" :show-overflow-tooltip="true" />
  <el-table-column label="用户昵称" align="center" key="nickName" prop="nickName" v-if="columns[2].visible" :show-overflow-tooltip="true" />
  <el-table-column label="部门" align="center" key="deptName" prop="dept.deptName" v-if="columns[3].visible" :show-overflow-tooltip="true" />
  <el-table-column label="手机号码" align="center" key="phonenumber" prop="phonenumber" v-if="columns[4].visible" width="120" />
  ......
</el-table>
2
3
4
5
6
7
8
9
10
# 使用Gzip解压缩静态文件
需要先完成上述的步骤 环境部署-Nginx配置-开启Gzip压缩
上述方案配置后由于Nginx的动态压缩是对每个请求先压缩再输出,这样造成虚拟机浪费了很多CPU。解决这个问题可以利用nginx的http_gzip_static_module模块,主要作用是对于需要压缩的文件,直接读取已经压缩好的文件(文件名为加.gz),而不是动态压缩(消耗性能)。所以采用这个方案需要确保目录文件名有生成.gz(最新版本的配置打包默认都会生成.gz文件)
首先需要安装nginx的http_gzip_static_module模块
# 安装模块(如果存在其他模块,用空格分开 --with-xxx --with-xxx,防止覆盖)
./configure --with-http_gzip_static_module

# 编译
make & make install
2
3
4
5
查询安装配置信息是否包含http_gzip_static_module
./nginx -V

nginx version: nginx/1.8.1
built by gcc 4.8.5 20150623 (Red Hat 4.8.5-39) (GCC)
built with OpenSSL 1.0.2k-fips  26 Jan 2017
TLS SNI support enabled
configure arguments: --prefix=/usr/local/nginx --with-http_ssl_module --with-http_gzip_static_module
2
3
4
5
6
7
配置nginx.conf的gzip_static属性
server {
	listen       80;
	server_name vue.ruoyi.vip;
	# 开启解压缩静态文件
	gzip_static on;
	location / {
		root   /home/ruoyi/projects/ruoyi-ui;
		try_files $uri $uri/ /index.html;
		index index.html;
	}
}
2
3
4
5
6
7
8
9
10
11
开启gzip_static后,对于任何文件都会先查找是否有对应的gz文件。
重启nginx,使其生效
./nginx -s reload
测试解压缩静态文件是否成功
# 查询 nginx worker 进程的PID
ps ax | grep nginx

# 使用strace追踪是否请求.gz
strace -p 23558 2>&1 | grep gz

# 如果请求.gz的文件表示开启成功
open("/xxxx/static/css/chunk-171ca186.f59a1d86.css.gz", O_RDONLY|O_NONBLOCK) = 46
open("/xxxx/static/js/chunk-01ef53b6.a7928e48.js.gz", O_RDONLY|O_NONBLOCK) = 46
2
3
4
5
6
7
8
9
# 如何防止请求重复提交
后端可以通过@RepeatSubmit注解控制
/**
 * 在对应方法添加注解 @RepeatSubmit
 */
@RepeatSubmit
public AjaxResult edit()
2
3
4
5
# 如何进行流量限制控制
后端可以通过@RateLimiter注解控制
/**
 * 在对应方法添加注解 @RateLimiter
 */
@RateLimiter(count = 100, time = 60)
public AjaxResult edit()
2
3
4
5
# 如何实现滑块验证码
# 如何缓存子页面页签
例如,字典管理,当我们打开多个子页签tab1和tab2,关闭tab2后,但是tab1缓存也被清空重置了,我们可以通过如下方法解决。
1、在src\layout\components下新建目录KeepAlive创建文件index.js
/**
 * 验证数据类型是否是正则
 * @param v
 * @returns {boolean}
 */
function isRegExp (v) {
  return Object.prototype.toString.call(v) === '[object RegExp]'
}

/**
 * 移除数组中指定的项
 * @param arr
 * @param item
 * @returns {*|{}|number|Array|*[]|[]|T[]}
 */
export function remove (arr, item) {
  if (arr.length) {
    const index = arr.indexOf(item)
    if (index > -1) {
      return arr.splice(index, 1)
    }
  }
}

/**
 * 判断数据是否定义了
 * @param v
 * @returns {boolean}
 */
function isDef (v) {
  return v !== undefined && v !== null
}

function isAsyncPlaceholder (node) {
  return node.isComment && node.asyncFactory
}

/**
 * 获取KeepAlive下的第一个子组件
 * @param children
 * @returns {*}
 */
function getFirstComponentChild (children) {
  if (Array.isArray(children)) {
    for (let i = 0; i < children.length; i++) {
      const c = children[i]
      if (isDef(c) && (isDef(c.componentOptions) || isAsyncPlaceholder(c))) {
        return c
      }
    }
  }
}

/**
 * 匹配缓存的页面组件
 * @param pattern
 * @param name
 * @returns {boolean|*}
 */
function matches (pattern, name) {
  if (Array.isArray(pattern)) {
    return pattern.indexOf(name) > -1
  } else if (typeof pattern === 'string') {
    return pattern.split(',').indexOf(name) > -1
  } else if (isRegExp(pattern)) {
    return pattern.test(name)
  }
  /* istanbul ignore next */
  return false
}

/**
 * 原先对于没有设置组件name值的,设置为路由的name
 * 现在我们直接取fullPath为name
 * @param {*} opts
 */
function getComponentName (opts) {
  // return (opts && opts.Ctor.options.name) || this.$route.name
  return this.$route.fullPath
}

/**
 * 删除缓存
 * @param keepAliveInstance
 * @param filter
 */
function pruneCache (keepAliveInstance, filter) {
  const { cache, keys, _vnode } = keepAliveInstance
  Object.keys(cache).forEach(key => {
    const cachedNode = cache[key]
    if (cachedNode) {
      if (key && !filter(key)) {
        pruneCacheEntry(cache, key, keys, _vnode)
      }
    }
  })
}

/**
 * 删除缓存条目
 * @param cache
 * @param key
 * @param keys
 * @param current
 */
function pruneCacheEntry (cache, key, keys, current) {
  const cached = cache[key]
  if (cached && (!current || cached.tag !== current.tag)) {
    cached.componentInstance.$destroy()
  }
  cache[key] = null
  remove(keys, key)
}

const patternTypes = [String, RegExp, Array]

export default {
  name: 'KeepAlive',
  // abstract: true,
  props: {
    include: patternTypes,
    exclude: patternTypes,
    max: [String, Number]
  },

  created () {
    // Object.create(null)创建一个非常干净且高度可定制的对象
    // 新创建的对象除了自身属性外,原型链上没有任何属性,也就是说没有继承Object的任何东西
    this.cache = Object.create(null)
    this.keys = []
  },

  mounted () {
    this.$watch('include', val => {
      pruneCache(this, name => matches(val, name))
    })
    this.$watch('exclude', val => {
      pruneCache(this, name => !matches(val, name))
    })
  },

  destroyed () {
    Object.keys(this.cache).forEach(key => {
      pruneCacheEntry(this.cache, key, this.keys)
    })
  },

  render () {
    const slot = this.$slots.default
    const vnode = getFirstComponentChild(slot)
    const componentOptions = vnode && vnode.componentOptions
    if (componentOptions) {
      // 获取组件的名称,此处修改后取fullPath作为name
      const key = getComponentName.call(this, componentOptions)

      const { include, exclude } = this
      // 没有缓存的直接返回vnode
      if (
        // not included
        (include && (!key || !matches(include, key))) ||
        // excluded
        (exclude && key && matches(exclude, key))
      ) {
        return vnode
      }

      const { cache, keys } = this
      if (cache[key]) {
        // 取缓存中的实例作为vnode的实例
        vnode.componentInstance = cache[key].componentInstance
        // 将当前缓存的key设置为最新的,便于后面缓存的数量超了以后删除最老的
        remove(keys, key)
        keys.push(key)
      } else {
        cache[key] = vnode
        keys.push(key)
        // 移除最老的缓存
        if (this.max && keys.length > parseInt(this.max)) {
          pruneCacheEntry(cache, keys[0], keys, this._vnode)
        }
      }
      vnode.data.keepAlive = true
    }
    return vnode || (slot && slot[0])
  }
}
2
3
4
5
6
7
8
9
10
11
12
13
14
15
16
17
18
19
20
21
22
23
24
25
26
27
28
29
30
31
32
33
34
35
36
37
38
39
40
41
42
43
44
45
46
47
48
49
50
51
52
53
54
55
56
57
58
59
60
61
62
63
64
65
66
67
68
69
70
71
72
73
74
75
76
77
78
79
80
81
82
83
84
85
86
87
88
89
90
91
92
93
94
95
96
97
98
99
100
101
102
103
104
105
106
107
108
109
110
111
112
113
114
115
116
117
118
119
120
121
122
123
124
125
126
127
128
129
130
131
132
133
134
135
136
137
138
139
140
141
142
143
144
145
146
147
148
149
150
151
152
153
154
155
156
157
158
159
160
161
162
163
164
165
166
167
168
169
170
171
172
173
174
175
176
177
178
179
180
181
182
183
184
185
186
2、修改src\layout\components\AppMain.vue
<template>
  <section class="app-main">
    <transition name="fade-transform" mode="out-in">
      <keep-alive :include="cachedViews">
        <router-view v-if="!$route.meta.link" :key="key" />
      </keep-alive>
    </transition>
    <iframe-toggle />
  </section>
</template>

<script>
import iframeToggle from "./IframeToggle/index"
import keepAlive from './KeepAlive'

export default {
  name: 'AppMain',
  components: { iframeToggle, keepAlive },
  computed: {
    cachedViews() {
      return this.$store.state.tagsView.cachedViews
    },
    key() {
      return this.$route.fullPath
    }
  }
}
</script>
......省略style代码
2
3
4
5
6
7
8
9
10
11
12
13
14
15
16
17
18
19
20
21
22
23
24
25
26
27
28
29
3、修改src\layout\components\TagsView\index.vue
<template>
  <div id="tags-view-container" class="tags-view-container">
    <scroll-pane ref="scrollPane" class="tags-view-wrapper" @scroll="handleScroll">
      <router-link
        v-for="tag in visitedViews"
        ref="tag"
        :key="tag.fullPath"
        :class="isActive(tag)?'active':''"
        :to="{ path: tag.fullPath, query: tag.query, fullPath: tag.fullPath }"
        tag="span"
        class="tags-view-item"
        :style="activeStyle(tag)"
        @click.middle.native="!isAffix(tag)?closeSelectedTag(tag):''"
        @contextmenu.prevent.native="openMenu(tag,$event)"
      >
        {{ tag.title }}
        <span v-if="!isAffix(tag)" class="el-icon-close" @click.prevent.stop="closeSelectedTag(tag)" />
      </router-link>
    </scroll-pane>
    <ul v-show="visible" :style="{left:left+'px',top:top+'px'}" class="contextmenu">
      <li @click="refreshSelectedTag(selectedTag)"><i class="el-icon-refresh-right"></i> 刷新页面</li>
      <li v-if="!isAffix(selectedTag)" @click="closeSelectedTag(selectedTag)"><i class="el-icon-close"></i> 关闭当前</li>
      <li @click="closeOthersTags"><i class="el-icon-circle-close"></i> 关闭其他</li>
      <li v-if="!isFirstView()" @click="closeLeftTags"><i class="el-icon-back"></i> 关闭左侧</li>
      <li v-if="!isLastView()" @click="closeRightTags"><i class="el-icon-right"></i> 关闭右侧</li>
      <li @click="closeAllTags(selectedTag)"><i class="el-icon-circle-close"></i> 全部关闭</li>
    </ul>
  </div>
</template>

<script>
import ScrollPane from './ScrollPane'
import path from 'path'

export default {
  components: { ScrollPane },
  data() {
    return {
      visible: false,
      top: 0,
      left: 0,
      selectedTag: {},
      affixTags: []
    }
  },
  computed: {
    visitedViews() {
      return this.$store.state.tagsView.visitedViews
    },
    routes() {
      return this.$store.state.permission.routes
    },
    theme() {
      return this.$store.state.settings.theme;
    }
  },
  watch: {
    $route() {
      this.addTags()
      this.moveToCurrentTag()
    },
    visible(value) {
      if (value) {
        document.body.addEventListener('click', this.closeMenu)
      } else {
        document.body.removeEventListener('click', this.closeMenu)
      }
    }
  },
  mounted() {
    this.initTags()
    this.addTags()
  },
  methods: {
    isActive(route) {
      return route.fullPath === this.$route.fullPath
    },
    activeStyle(tag) {
      if (!this.isActive(tag)) return {};
      return {
        "background-color": this.theme,
        "border-color": this.theme
      };
    },
    isAffix(tag) {
      return tag.meta && tag.meta.affix
    },
    isFirstView() {
      try {
        return this.selectedTag.fullPath === this.visitedViews[1].fullPath || this.selectedTag.fullPath === '/index'
      } catch (err) {
        return false
      }
    },
    isLastView() {
      try {
        return this.selectedTag.fullPath === this.visitedViews[this.visitedViews.length - 1].fullPath
      } catch (err) {
        return false
      }
    },
    filterAffixTags(routes, basePath = '/') {
      let tags = []
      routes.forEach(route => {
        if (route.meta && route.meta.affix) {
          const tagPath = path.resolve(basePath, route.path)
          tags.push({
            fullPath: route.fullPath,
            path: tagPath,
            name: route.name,
            meta: { ...route.meta }
          })
        }
        if (route.children) {
          const tempTags = this.filterAffixTags(route.children, route.fullPath)
          if (tempTags.length >= 1) {
            tags = [...tags, ...tempTags]
          }
        }
      })
      return tags
    },
    initTags() {
      const affixTags = this.affixTags = this.filterAffixTags(this.routes)
      for (const tag of affixTags) {
        this.$store.dispatch('tagsView/addVisitedView', tag)
      }
    },
    addTags() {
      const { name } = this.$route
      if (name) {
        this.$store.dispatch('tagsView/addView', this.$route)
        if (this.$route.meta.link) {
          this.$store.dispatch('tagsView/addIframeView', this.$route)
        }
      }
      return false
    },
    moveToCurrentTag() {
      const tags = this.$refs.tag
      this.$nextTick(() => {
        for (const tag of tags) {
          if (tag.to.fullPath === this.$route.fullPath) {
            this.$refs.scrollPane.moveToTarget(tag)
            // when query is different then update
            if (tag.to.fullPath !== this.$route.fullPath) {
              this.$store.dispatch('tagsView/updateVisitedView', this.$route)
            }
            break
          }
        }
      })
    },
    refreshSelectedTag(view) {
      this.$tab.refreshPage(view);
      if (this.$route.meta.link) {
        this.$store.dispatch('tagsView/delIframeView', this.$route)
      }
    },
    closeSelectedTag(view) {
      this.$tab.closePage(view).then(({ visitedViews }) => {
        if (this.isActive(view)) {
          this.toLastView(visitedViews, view)
        }
      })
    },
    closeRightTags() {
      this.$tab.closeRightPage(this.selectedTag).then(visitedViews => {
        if (!visitedViews.find(i => i.fullPath === this.$route.fullPath)) {
          this.toLastView(visitedViews)
        }
      })
    },
    closeLeftTags() {
      this.$tab.closeLeftPage(this.selectedTag).then(visitedViews => {
        if (!visitedViews.find(i => i.fullPath === this.$route.fullPath)) {
          this.toLastView(visitedViews)
        }
      })
    },
    closeOthersTags() {
      this.$router.push(this.selectedTag).catch(()=>{});
      this.$tab.closeOtherPage(this.selectedTag).then(() => {
        this.moveToCurrentTag()
      })
    },
    closeAllTags(view) {
      this.$tab.closeAllPage().then(({ visitedViews }) => {
        if (this.affixTags.some(tag => tag.fullPath === this.$route.fullPath)) {
          return
        }
        this.toLastView(visitedViews, view)
      })
    },
    toLastView(visitedViews, view) {
      const latestView = visitedViews.slice(-1)[0]
      if (latestView) {
        this.$router.push(latestView.fullPath)
      } else {
        // now the default is to redirect to the home page if there is no tags-view,
        // you can adjust it according to your needs.
        if (view.name === 'Dashboard') {
          // to reload home page
          this.$router.replace({ path: '/redirect' + view.fullPath })
        } else {
          this.$router.push('/')
        }
      }
    },
    openMenu(tag, e) {
      const menuMinWidth = 105
      const offsetLeft = this.$el.getBoundingClientRect().left // container margin left
      const offsetWidth = this.$el.offsetWidth // container width
      const maxLeft = offsetWidth - menuMinWidth // left boundary
      const left = e.clientX - offsetLeft + 15 // 15: margin right

      if (left > maxLeft) {
        this.left = maxLeft
      } else {
        this.left = left
      }

      this.top = e.clientY
      this.visible = true
      this.selectedTag = tag
    },
    closeMenu() {
      this.visible = false
    },
    handleScroll() {
      this.closeMenu()
    }
  }
}
</script>
......省略style代码
2
3
4
5
6
7
8
9
10
11
12
13
14
15
16
17
18
19
20
21
22
23
24
25
26
27
28
29
30
31
32
33
34
35
36
37
38
39
40
41
42
43
44
45
46
47
48
49
50
51
52
53
54
55
56
57
58
59
60
61
62
63
64
65
66
67
68
69
70
71
72
73
74
75
76
77
78
79
80
81
82
83
84
85
86
87
88
89
90
91
92
93
94
95
96
97
98
99
100
101
102
103
104
105
106
107
108
109
110
111
112
113
114
115
116
117
118
119
120
121
122
123
124
125
126
127
128
129
130
131
132
133
134
135
136
137
138
139
140
141
142
143
144
145
146
147
148
149
150
151
152
153
154
155
156
157
158
159
160
161
162
163
164
165
166
167
168
169
170
171
172
173
174
175
176
177
178
179
180
181
182
183
184
185
186
187
188
189
190
191
192
193
194
195
196
197
198
199
200
201
202
203
204
205
206
207
208
209
210
211
212
213
214
215
216
217
218
219
220
221
222
223
224
225
226
227
228
229
230
231
232
233
234
235
236
4、修改src\store\modules\tagsView.js
const state = {
  visitedViews: [],
  cachedViews: [],
  iframeViews: []
}

const mutations = {
  ADD_IFRAME_VIEW: (state, view) => {
    if (state.iframeViews.some(v => v.fullPath === view.fullPath)) return
    state.iframeViews.push(
      Object.assign({}, view, {
        title: view.meta.title || 'no-name'
      })
    )
  },
  ADD_VISITED_VIEW: (state, view) => {
    if (!view.fullPath || state.visitedViews.some(v => v.fullPath === view.fullPath)) return
    state.visitedViews.push(
      Object.assign({}, view, {
        title: view.meta.title || 'no-name'
      })
    )
  },
  ADD_CACHED_VIEW: (state, view) => {
    if (state.cachedViews.includes(view.fullPath)) return
    if (view.meta && !view.meta.noCache) {
      state.cachedViews.push(view.fullPath)
    }
  },
  DEL_VISITED_VIEW: (state, view) => {
    for (const [i, v] of state.visitedViews.entries()) {
      if (v.fullPath === view.fullPath) {
        state.visitedViews.splice(i, 1)
        break
      }
    }
    state.iframeViews = state.iframeViews.filter(item => item.fullPath !== view.fullPath)
  },
  DEL_IFRAME_VIEW: (state, view) => {
    state.iframeViews = state.iframeViews.filter(item => item.fullPath !== view.fullPath)
  },
  DEL_CACHED_VIEW: (state, view) => {
    const index = state.cachedViews.indexOf(view.fullPath)
    index > -1 && state.cachedViews.splice(index, 1)
  },

  DEL_OTHERS_VISITED_VIEWS: (state, view) => {
    state.visitedViews = state.visitedViews.filter(v => {
      return v.meta.affix || v.fullPath === view.fullPath
    })
    state.iframeViews = state.iframeViews.filter(item => item.fullPath === view.fullPath)
  },
  DEL_OTHERS_CACHED_VIEWS: (state, view) => {
    const index = state.cachedViews.indexOf(view.fullPath)
    if (index > -1) {
      state.cachedViews = state.cachedViews.slice(index, index + 1)
    } else {
      state.cachedViews = []
    }
  },
  DEL_ALL_VISITED_VIEWS: state => {
    // keep affix tags
    const affixTags = state.visitedViews.filter(tag => tag.meta.affix)
    state.visitedViews = affixTags
    state.iframeViews = []
  },
  DEL_ALL_CACHED_VIEWS: state => {
    state.cachedViews = []
  },
  UPDATE_VISITED_VIEW: (state, view) => {
    for (let v of state.visitedViews) {
      if (v.fullPath === view.fullPath) {
        v = Object.assign(v, view)
        break
      }
    }
  },
  DEL_RIGHT_VIEWS: (state, view) => {
    const index = state.visitedViews.findIndex(v => v.fullPath === view.fullPath)
    if (index === -1) {
      return
    }
    state.visitedViews = state.visitedViews.filter((item, idx) => {
      if (idx <= index || (item.meta && item.meta.affix)) {
        return true
      }
      const i = state.cachedViews.indexOf(item.fullPath)
      if (i > -1) {
        state.cachedViews.splice(i, 1)
      }
      if(item.meta.link) {
        const fi = state.iframeViews.findIndex(v => v.fullPath === item.fullPath)
        state.iframeViews.splice(fi, 1)
      }
      return false
    })
  },
  DEL_LEFT_VIEWS: (state, view) => {
    const index = state.visitedViews.findIndex(v => v.fullPath === view.fullPath)
    if (index === -1) {
      return
    }
    state.visitedViews = state.visitedViews.filter((item, idx) => {
      if (idx >= index || (item.meta && item.meta.affix)) {
        return true
      }
      const i = state.cachedViews.indexOf(item.fullPath)
      if (i > -1) {
        state.cachedViews.splice(i, 1)
      }
      if(item.meta.link) {
        const fi = state.iframeViews.findIndex(v => v.fullPath === item.fullPath)
        state.iframeViews.splice(fi, 1)
      }
      return false
    })
  }
}

....省略其他代码
2
3
4
5
6
7
8
9
10
11
12
13
14
15
16
17
18
19
20
21
22
23
24
25
26
27
28
29
30
31
32
33
34
35
36
37
38
39
40
41
42
43
44
45
46
47
48
49
50
51
52
53
54
55
56
57
58
59
60
61
62
63
64
65
66
67
68
69
70
71
72
73
74
75
76
77
78
79
80
81
82
83
84
85
86
87
88
89
90
91
92
93
94
95
96
97
98
99
100
101
102
103
104
105
106
107
108
109
110
111
112
113
114
115
116
117
118
119
120
# 异步处理获取用户信息
项目中可以通过SecurityContextHolder.getContext().getAuthentication()获取用户信息,例如
LoginUser loginUser = SecurityUtils.getLoginUser()
绝大多数情况下都是通过同步的方式来获取用户信息,如果通过异步获取还需要添加AsyncConfigurerSupport处理。
// 启动类上面添加,开启异步调用
@EnableAsync
// 方法上面添加,异步执行
@Async
2
3
4
package com.ruoyi.framework.config;

import java.util.concurrent.Executor;
import java.util.concurrent.Executors;
import org.springframework.context.annotation.Configuration;
import org.springframework.scheduling.annotation.AsyncConfigurerSupport;
import org.springframework.security.concurrent.DelegatingSecurityContextExecutorService;

@Configuration
public class AsyncConfig extends AsyncConfigurerSupport
{
    /**
     * 异步执行需要使用权限框架自带的包装线程池 保证权限信息的传递
     */
    @Override
    public Executor getAsyncExecutor()
    {
        return new DelegatingSecurityContextExecutorService(Executors.newFixedThreadPool(5));
    }
}
2
3
4
5
6
7
8
9
10
11
12
13
14
15
16
17
18
19
20
21
# 前端如何配置后端接口
对于特殊情况,需要直接调用后台接口或者指定域名可以修改.env.production文件VUE_APP_BASE_API属性
# 后端接口地址
VUE_APP_BASE_API = '//localhost:8080'
2
# 图片上传成功不能显示
文件上传成功后,请求访问后台地址会根据profile进行匹配,需要自己配置nginx代理,参考如下。
location /profile/ {
    # 方式一:指向地址
    proxy_pass http://127.0.0.1:9999/profile/;
}
2
3
4
location /profile/
{
    # 方式二:指向目录,对应后台`application.yml`中的`profile`配置
    alias /home/ruoyi/uploadPath/;
}
2
3
4
5
# 富文本自定义上传地址
需要设置:uploadUrl属性,指定上传地址。
<editor v-model="form.noticeContent" :min-height="192" :uploadUrl="uploadUrl" />

export default {
  data() {
    return {
      uploadUrl: process.env.VUE_APP_BASE_API + "/common/upload",
}
2
3
4
5
6
7
# 富文本显示HTML内容
需要定义在ql-container ql-snow/ql-editor样式里面。
<div class="ql-container ql-snow">
  <div class="ql-editor" v-html="form.noticeContent"/>
</div>
2
3
# 富文本图片如何拖拽
1、安装依赖
npm install quill-image-resize-module
2、在vue.config.js文件中新增以下代码
const webpack = require('webpack');
....

plugins: [
  ....
  new webpack.ProvidePlugin({
	'window.Quill': 'quill/dist/quill.js',
	'Quill': 'quill/dist/quill.js',
  })
],
2
3
4
5
6
7
8
9
10
3、修改富文本组件src\components\Editor\index.vue
....
....
<script>
....
import ImageResize from 'quill-image-resize-module'
Quill.register('modules/imageResize', ImageResize);

export default {
  name: "Editor",
  data() {
    return {
      ....
      options: {
        ....
        modules: {
          ....
          //图片缩放
          imageResize: {
            displayStyles: {
              backgroundColor: 'black',
              border: 'none',
              color: 'white'
            },
            modules: ['Resize', 'DisplaySize', 'Toolbar']
          },
        },
        ....
      },
    };
  },
  ....
};
</script>
2
3
4
5
6
7
8
9
10
11
12
13
14
15
16
17
18
19
20
21
22
23
24
25
26
27
28
29
30
31
32
33
# 侧边栏如何默认展开
某些场景下,用户需要默认展开侧边栏的某些sub-menu,可以通过default-openeds来进行设置。
layout\components\Sidebar\index.vue
<el-menu
	:default-openeds="['/system', '/tool']"
	:default-active="activeMenu"
	:collapse="isCollapse"
	:background-color="settings.sideTheme === 'theme-dark' ? variables.menuBg : variables.menuLightBg"
	:text-color="settings.sideTheme === 'theme-dark' ? variables.menuText : 'rgba(0,0,0,.65)'"
	:unique-opened="false"
	:active-text-color="settings.theme"
	:collapse-transition="false"
	mode="vertical"
    >
	<sidebar-item v-for="route in sidebarRouters" :key="route.path  + index" :item="route" :base-path="route.path" />
  </el-menu>
2
3
4
5
6
7
8
9
10
11
12
13
# 如何调整左侧菜单宽度
如果觉得左侧菜单宽度不够,可以进行调整。
在ruoyi-ui\src\assets\styles\variables.scss修改变量$sideBarWidth: 200px;
# 左侧菜单如何默认收缩
在ruoyi-ui\src\store\modules\app.js修改变量opened: false;
const state = {
  sidebar: {
    opened: Cookies.get('sidebarStatus') ? !!+Cookies.get('sidebarStatus') : false,
    withoutAnimation: false
  },
  device: 'desktop',
  size: Cookies.get('size') || 'medium'
}
2
3
4
5
6
7
8
# 菜单名称过长显示不全
菜单名称太长的话超出宽度部分会显示...,此时我们可以自己调整一下菜单的宽度或者设置一个title,这样鼠标移动上去显示完整的菜单名称。
在layout\components\Sidebar\SidebarItem.vue文件设置:title
<sidebar-item
  v-for="child in item.children"
  :key="child.path"
  :is-nest="true"
  :item="child"
  :title="child.meta.title"
  :base-path="resolvePath(child.path)"
  class="nest-menu"
/>
2
3
4
5
6
7
8
9
在layout\components\Sidebar\Item.vue文件设置title={(title)}
if (title) {
  vnodes.push(<span slot='title' title={(title)}>{(title)}</span>)
}
2
3
# 进入首页默认记忆控制台
例如用户退出后,下次登陆系统,能默认打开之前工作路径。
可以在request.js,修改LogOut
store.dispatch('LogOut').then(() => {
  location.href = '/index';
})
2
3
换成
store.dispatch('LogOut').then(() => {
  location.reload();
})
2
3
# 如何设置接口的超时时间
全局超时时间设置src/utils/request.js
const service = axios.create({
  baseURL: process.env.VUE_APP_BASE_API,
  // 默认超时时间为10秒,可以自己定义默认的全局 timeout
  timeout: 10000
})
2
3
4
5
针对某个单独接口设置超时时间
// 在自己的接口里面单独加个`timeout`属性就行了
export function getCodeImg() {
  return request({
    url: '/captchaImage',
    method: 'get',
    timeout: 20000 // 20秒
  })
}
2
3
4
5
6
7
8
针对下载接口单独设置超时时间
// 在自己的接口里面单独加个`timeout`属性就行了
handleExport() {
  this.download('system/xxxx/export', {
	...this.queryParams
  }, `xxxx_${new Date().getTime()}.xlsx`, { timeout: 30000 }) // 30秒
},
2
3
4
5
6
# 默认跳转到第一个子菜单
在开启TopNav时需要点击主菜单时,想默认跳转到第一个子菜单可以在handleSelect事件处理。
// 菜单选择事件
handleSelect(key, keyPath) {
  this.currentIndex = key;
  if (this.ishttp(key)) {
	// http(s):// 路径新窗口打开
	window.open(key, "_blank");
  } else if (key.indexOf("/redirect") !== -1) {
	// /redirect 路径内部打开
	this.$router.push({ path: key.replace("/redirect", "") });
  } else {
	// 显示左侧联动菜单
	this.activeRoutes(key);

	let myRoutes = [];
	if (this.childrenMenus && this.childrenMenus.length > 0) {
	  this.childrenMenus.map((item) => {
		if (key == item.parentPath || (key == "index" && "" == item.path)) {
		  myRoutes.push(item);
		}
	  });
	}
	setTimeout(() => {
	  if(myRoutes[0].path != this.$route.path) {
		this.$router.replace({
		  path: myRoutes[0].path
		})
	  } else {
		this.$router.replace({
		  path: '/index'
		})
	  }
	}, 100)
  }
},
2
3
4
5
6
7
8
9
10
11
12
13
14
15
16
17
18
19
20
21
22
23
24
25
26
27
28
29
30
31
32
33
34
# 生产环境图标加载时乱码
有一些小伙伴确实会出现这种情况,是因为dart-sass的问题,似乎这个作者现在也没打算解决。问题链接:https://github.com/sass/dart-sass/issues/1219 (opens new window)
如遇见可以换成node-sass。
1、修改package.json(记得重新install)。
// 添加`node-sass`
"node-sass": "4.14.1",

// 移除`sass`
"sass": "1.32.0",
2
3
4
5
2、修改部分文件为node-sass语法
::v-deep替换成/deep/
也可以采用如下方案,在vue.config.js加入sassOptions选项(建议)。
css: {
  loaderOptions: {
    sass: {
      sassOptions: { outputStyle: "expanded" }
    }
  }
},
2
3
4
5
6
7
详细的说明可以参考官方文档 https://webpack.js.org/loaders/sass-loader/#sassoptions (opens new window)
# 解决node-sass安装失败
node-sass 安装失败的原因
npm 安装 node-sass 依赖时,会从 github.com 上下载 .node 文件。由于国内网络环境的问题,这个下载时间可能会很长,甚至导致超时失败。
这是使用 sass 的同学可能都会遇到的郁闷的问题。
解决方案就是使用其他源,或者使用工具下载,然后将安装源指定到本地。
解决方法一:使用淘宝镜像源(推荐)
设置变量 sass_binary_site,指向淘宝镜像地址。示例
npm i node-sass --sass_binary_site=https://npm.taobao.org/mirrors/node-sass/

// 也可以设置系统环境变量的方式。示例
// linux、mac 下
SASS_BINARY_SITE=https://npm.taobao.org/mirrors/node-sass/ npm install node-sass

// window 下
set SASS_BINARY_SITE=https://npm.taobao.org/mirrors/node-sass/ && npm install node-sass
2
3
4
5
6
7
8
或者设置全局镜像源:
npm config set sass_binary_site https://npm.taobao.org/mirrors/node-sass/
之后再涉及到 node-sass 的安装时就会从淘宝镜像下载。
解决方法二:使用 cnpm
使用 cnpm 安装 node-sass 会默认从淘宝镜像源下载,也是一个办法:
cnpm install node-sass
解决方法三:创建.npmrc文件
在项目根目录创建.npmrc文件,复制下面代码到该文件。
phantomjs_cdnurl=http://cnpmjs.org/downloads
sass_binary_site=https://npm.taobao.org/mirrors/node-sass/
registry=https://registry.npm.taobao.org
2
3
保存后 删除之前安装失败的包(第一次安装请跳过此步)
npm uninstall node-sass
重新安装
npm install node-sass
# 浏览器兼容性问题需求
本项目暂时没有兼容性需求,如有兼容性需求可自行使用 babel-polyfill。
// 下载依赖
npm install --save babel-polyfill
2
在入口文件中引入
import 'babel-polyfill'
// 或者
require('babel-polyfill') //es6
2
3
在 webpack.config.js 中加入 babel-polyfill 到你的入口数组:
module.exports = {
  entry: ['babel-polyfill', './app/js']
}
2
3
具体可参考 link (opens new window)
或者更简单暴力 polyfill.io (opens new window) 使用它给的一个 cdn 地址,引入这段 js 之后它会自动判断游览器,加载缺少的那部分 polyfill,但国内速度肯能不行,大家可以自己搭 cdn。
# 如何分析构建文件体积
如果你的构建文件很大,你可以通过 webpack-bundle-analyzer 命令构建并分析依赖模块的体积分布,从而优化你的代码。
npm run preview -- --report
运行之后你就可以在 http://localhost:9526/report.html (opens new window) 页面看到具体的体积分布
具体的优化可以参考 Webpack 大法之 Code Splitting (opens new window)
TIP
强烈建议开启 gzip ,使用之后普遍体积只有原先 1/3 左右。打出来的 app.js 过大,查看一下是不是 Uglify 配置不正确或者 sourceMap 没弄对。 优化相关请看该 Webpack Freestyle 之 Long Term Cache (opens new window)
# 模态框点击空白不消失
设置属性:close-on-click-modal="false"
<el-dialog :close-on-click-modal="false"></el-dialog>
如果想全部设置可以在main.js中添加以下内容
Element.Dialog.props.closeOnClickModal.default = false
# 如何给模态框添加拖拽
设置属性v-dialogDrag
<el-dialog v-dialogDrag></el-dialog>
WARNING
如果是Vue3版本,拖拽直接使用 <el-dialog draggable></el-dialog>
# 模态框可拖动弹窗宽度
设置属性v-dialogDragWidth
<el-dialog v-dialogDragWidth></el-dialog>
# 模态框可拖动弹窗高度
设置属性v-dialogDragHeight
<el-dialog v-dialogDragHeight></el-dialog>
# 如何给字典自定义样式
默认提供了default、primary、success、info、warning、danger这几种样式选择,但是有时候并不满足自己的样式需求,那么就可以自定义,参考如下示例流程。
1、我们先在ruoyi.scss自定义一个粉色样式
.el-tag.custom-pink {
    background-color: #ffeded;
    border-color: #ffdbdb;
    color: #ff66cc;
}
2
3
4
5
2、找到对应的数据字典,进入字典数据,新增时填写样式属性为custom-pink。
3、在对应的表格页面去实现字典,会根据值匹配加上custom-pink样式生效。
# 如何给表格自适应高度
1、el-table增加max-height属性
<el-table :max-height="tableHeight">
2、data增加tableHeight变量
data() {
  return {
      // 表格高度
      tableHeight: 0,
	  ....
  }
};
2
3
4
5
6
7
3、mounted获取计算高度
mounted() {
  this.$nextTick(() => {
    // window.innerHeight 浏览器窗口的可见高度,下面的 220 是除了table最大高度的剩余空间。
    let height = window.innerHeight - this.$refs.queryForm.$el.offsetHeight - 220;
    this.tableHeight = height;
  })
},
2
3
4
5
6
7
# 如何给表格设置固定列
在el-table-column对应列添加fixed参数,可选值left、right
<el-table-column label="编号" fixed="left">
<el-table-column label="操作" fixed="right">
2
# 如何给默认的表格加边框
el-table 加上 border
<el-table border :data="dataList"/>
如果想全部设置可以在main.js中添加以下内容
// 带有斑马纹
Element.Table.props.stripe = {
  default:true,
  type:Boolean
}

// 带有边框
Element.Table.props.border = {
  default:true,
  type:Boolean
}
2
3
4
5
6
7
8
9
10
11
# 表单按回车键会刷新页面问题
原因:当表单只有一个输入框时,就会造成该现象。
解决:在el-form标签里加上@submit.native.prevent即可。
<!-- 在这里加 @submit.native.prevent -->
<el-form @submit.native.prevent/>
	<el-form-item>
		<el-input v-model="query"></el-input>
	</el-form-item>
</el-form>
2
3
4
5
6
# 如何在表格中实现图片预览
方式一:使用img预览组件
<el-table-column label="图片" align="center" prop="url">
    <template slot-scope="scope">
        <img :src="scope.row.url" alt="" style="width: 45px;height: 45px">
    </template>
</el-table-column>
2
3
4
5
方式二:使用image-preview预览组件(推荐)
<!-- 内链地址预览 -->
<el-table-column label="图片" align="center" prop="url" width="100">
  <template slot-scope="scope">
	  <image-preview :src="scope.row.url" :width="50" :height="50"/>
  </template>
</el-table-column>

<!-- 外链地址预览 -->
<el-table-column label="图片" align="center" prop="url" width="100">
  <image-preview src="http://ruoyi.vip/images/logo.png" />
</el-table-column>
2
3
4
5
6
7
8
9
10
11
提示
默认的img组件不会携带VUE_APP_BASE_API不能被代理,通过image-preview封装的预览组件会自动携带VUE_APP_BASE_API会被代理。
# 组件卸载钩子触发方案
当一个组件在<KeepAlive>中被切换时,它的activated和deactivated生命周期钩子将被调用,用来替代mounted和unmounted。这适用于<KeepAlive>的直接子节点及其所有子孙节点。
所以我们页面组件在使用keep-alive缓存时,卸载就可以换成activated和deactivated,Vue3语法参考示例。
// activated 为 keep-alive 包含的组件再次渲染的时候触发
onActivated(() => {
  alert('onMounted');
})

// deactivated 为 keep-alive 包含的组件销毁的时候触发
onDeactivated(() => {
  alert('onBeforeUnmount');
})
2
3
4
5
6
7
8
9
# nodejs版本过高解决方案
由于nodejs版本过高,可能会导致vue-cli项目运行报错。
- 解决方案1:每次启动项目前,输入配置命令:
set NODE_OPTIONS=--openssl-legacy-provider
- 解决方案2:修改
package.json配置文件:
"dev": "set NODE_OPTIONS=--openssl-legacy-provider && vue-cli-service serve --open",
"build:prod": "set NODE_OPTIONS=--openssl-legacy-provider && vue-cli-service build --report",
"build:stage": "set NODE_OPTIONS=--openssl-legacy-provider && vue-cli-service build --mode staging",
"preview": "set NODE_OPTIONS=--openssl-legacy-provider && node build/index.js --preview",
2
3
4
- 解决方案3:使用
nodejs低版本:
https://pan.baidu.com/s/1E9J52g6uW_VFWY34fHL6zA 提取码: vneh

路径地址:微服务工具包/基础工具包/node-v14.16.1-x64.msi
2
3
# 控制台debuger位置错误问题
RuoYi-Vue3中的vite-plugin-vue-setup-extend用于解决vue3下script setup语法糖下 ,手动设置组件name不方便的问题。可能会导致vue组件debuger时,
断点位置不正确问题,(直至0.4.0版本依旧有该问题)。
目前的解决方案如下:
1、package.json新增类型为commonjs
{
  "name": "ruoyi",
  "version": "3.8.6",
  "description": "若依管理系统",
  "author": "若依",
  "license": "MIT",
  "type": "commonjs",
}
2
3
4
5
6
7
8
2、vite-plugin-vue-setup-extend替换为unplugin-vue-setup-extend-plus
"unplugin-vue-setup-extend-plus": "1.0.0"
3、vite\plugins\setup-extend.js修改为unplugin-vue-setup-extend-plus/vite
import setupExtend from 'unplugin-vue-setup-extend-plus/vite'

export default function createSetupExtend() {
    return setupExtend({})
}
2
3
4
5
# 使用localStorage代替cookie
对于一些特殊情况或需求,项目不需要cookie,那么我们可以使用localStorage来代替。
1、package.json删除cookie的相关依赖"js-cookie": "3.0.1",
main.js、store/modules/app.js、utils/auth.js、login.vue文件,删除导入的import Cookies from 'js-cookie'
2、main.js的Cookies.get更换为localStorage.getItem
Vue.use(Element, {
  size: localStorage.getItem('size') || 'medium' // set element-ui default size
})
2
3
3、utils/auth.js更换Cookies相关方法为localStorage
const TokenKey = 'Admin-Token'

export function getToken() {
  return localStorage.getItem(TokenKey)
}

export function setToken(token) {
  return localStorage.setItem(TokenKey, token)
}

export function removeToken() {
  return localStorage.removeItem(TokenKey)
}
2
3
4
5
6
7
8
9
10
11
12
13
4、store/modules/app.js更换Cookies相关方法为localStorage
const state = {
  sidebar: {
    opened: localStorage.getItem('sidebarStatus') ? !!+localStorage.getItem('sidebarStatus') : true,
    withoutAnimation: false,
    hide: false
  },
  device: 'desktop',
  size: localStorage.getItem('size') || 'medium'
}

const mutations = {
  TOGGLE_SIDEBAR: state => {
    if (state.sidebar.hide) {
      return false;
    }
    state.sidebar.opened = !state.sidebar.opened
    state.sidebar.withoutAnimation = false
    if (state.sidebar.opened) {
      localStorage.setItem('sidebarStatus', 1)
    } else {
      localStorage.setItem('sidebarStatus', 0)
    }
  },
  CLOSE_SIDEBAR: (state, withoutAnimation) => {
    localStorage.setItem('sidebarStatus', 0)
    state.sidebar.opened = false
    state.sidebar.withoutAnimation = withoutAnimation
  },
  TOGGLE_DEVICE: (state, device) => {
    state.device = device
  },
  SET_SIZE: (state, size) => {
    state.size = size
    localStorage.setItem('size', size)
  },
  SET_SIDEBAR_HIDE: (state, status) => {
    state.sidebar.hide = status
  }
}
....
2
3
4
5
6
7
8
9
10
11
12
13
14
15
16
17
18
19
20
21
22
23
24
25
26
27
28
29
30
31
32
33
34
35
36
37
38
39
40
5、login.vue更换Cookies相关方法为localStorage
....
getCookie() {
  const username = localStorage.getItem("username");
  const password = localStorage.getItem("password");
  const rememberMe = localStorage.getItem('rememberMe')
  this.loginForm = {
	username: username === null ? this.loginForm.username : username,
	password: password === null ? this.loginForm.password : decrypt(password),
	rememberMe: rememberMe === null ? false : Boolean(rememberMe)
  };
},
handleLogin() {
  this.$refs.loginForm.validate(valid => {
	if (valid) {
	  this.loading = true;
	  if (this.loginForm.rememberMe) {
		localStorage.setItem("username", this.loginForm.username);
		localStorage.setItem("password", encrypt(this.loginForm.password));
		localStorage.setItem('rememberMe', this.loginForm.rememberMe);
	  } else {
		localStorage.removeItem("username");
		localStorage.removeItem("password");
		localStorage.removeItem('rememberMe');
	  }
	  this.$store.dispatch("Login", this.loginForm).then(() => {
		this.$router.push({ path: this.redirect || "/" }).catch(()=>{});
	  }).catch(() => {
		this.loading = false;
		if (this.captchaEnabled) {
		  this.getCode();
		}
	  });
	}
  });
}
....
2
3
4
5
6
7
8
9
10
11
12
13
14
15
16
17
18
19
20
21
22
23
24
25
26
27
28
29
30
31
32
33
34
35
36
# 如何支持多类型数据库
# 如何降低mysql驱动版本
# 如何配置tomcat访问日志
# 如何配置项目访问根路径
# 普通用户创建文件无权限
# Swagger的启用和禁用
# 如何汉化系统接口Swagger
# Swagger接口出现转换错误
# 如何导出数据列表PDF格式
前端文件对应方法修改文件名xlsx后缀为pdf
/** 导出按钮操作 */
handleExport() {
  this.download('xxxx/xxxx/export', {
	...this.queryParams
  }, `config_${new Date().getTime()}.pdf`)
}
2
3
4
5
6
# 如何Excel导出时添加水印
# 如何Excel导出子对象多个字段
# Tomcat部署多个War包项目异常
# Tomcat临时目录tmp抛错误异常
# 如何部署配置支持https访问
# 特殊字符串被过滤的解决办法
# Linux系统验证码乱码解决方法
# 公共数据库定时任务没有被执行
# 如何处理Long类型精度丢失问题
# 如何修改Swagger默认访问地址
由于采用的前后端分离模式,且前端Swagger使用的iframe打开页面。所以默认请求的是前端地址,然后前端通过代理转发到后端接口。对于特殊情况需要直接请求后端提供如下方案:
方案1:使用新窗口打开,不要用iframe打开。因为swagger默认是获取当前服务的地址。
方案2:在SwaggerConfig配置中createRestApi方法设置后端的地址。
return new Docket(DocumentationType.SWAGGER_2)
    ....
	// 后端地址
    .host("localhost:8080")
2
3
4
# 如何默认显示顶部导航栏菜单
在ruoyi-ui\src\settings.js中设置topNav为true表示显示顶部导航,也可以在用户布局设置中开启TopNav后保存配置。
/**
* 是否显示顶部导航
*/
topNav: true,
2
3
4
# 如何修改超级管理员登录密码
1、如果是自己知道超级管理员的密码且需要修改的情况。
默认口令 admin/admin123,可以登录后在首页个人中心修改密码。
2、如果自己忘记了超级管理员的密码可以重新生成秘钥替换数据库密码。
public static void main(String[] args)
{
	System.out.println(SecurityUtils.encryptPassword("admin123"));
}
2
3
4
# 如何修改数据监控登录账户密码
# 如何设置用户登录缓存超时时间
找到ruoyi-admin\src\main\resources下面的application.yml配置文件
# token配置
token:
    # 令牌有效期(默认30分钟)
    expireTime: 30
2
3
4
# 如何格式化前端日期时间戳内容
对应一些时间格式需要在前端进行格式化操作情况,解决方案如下
1、后端使用JsonFormat注解格式化日期,时间戳yyyy-MM-dd HH:mm:ss
/** 创建时间 */
@JsonFormat(pattern = "yyyy-MM-dd HH:mm:ss")
private Date time;
2
3
2、前端使用parseTime方法格式化日期,时间戳{y}-{m}-{d} {h}:{i}:{s}
<el-table-column label="创建时间" align="center" prop="createTime" width="160">
	<template slot-scope="scope">
	  <span>{{ parseTime(scope.row.createTime, '{y}-{m}-{d} {h}:{i}:{s}') }}</span>
	</template>
</el-table-column>
2
3
4
5
# Redis缓存lettuce替换成jedis
在springboot中引入spring-boot-starter-data-redis依赖时,默认使用的时lettuce,有时可能我们不想使用lettuce而是使用Jedis来操作redis,这就需要我们在引入spring-boot-starter-data-redis依赖时做排除lettuce,操作如下:
1、在ruoyi-common\pom.xml手动添加jedis依赖,排除lettuce。
<!-- redis 缓存操作 -->
<dependency>
	<groupId>org.springframework.boot</groupId>
	<artifactId>spring-boot-starter-data-redis</artifactId>
	<exclusions>
		<exclusion>
			<groupId>io.lettuce</groupId>
			<artifactId>lettuce-core</artifactId>
		</exclusion>
	</exclusions>
</dependency>

<dependency>
	<groupId>redis.clients</groupId>
	<artifactId>jedis</artifactId>
</dependency>
2
3
4
5
6
7
8
9
10
11
12
13
14
15
16
2、在application.yml中替换配置,配置基本同上,只需要将lettuce换成jedis即可。
spring:
  redis:
    jedis:
      pool:
        # 连接池中的最小空闲连接
        min-idle: 0
        # 连接池中的最大空闲连接
        max-idle: 8
        # 连接池的最大数据库连接数
        max-active: 8
        # #连接池最大阻塞等待时间(使用负值表示没有限制)
        max-wait: -1ms
2
3
4
5
6
7
8
9
10
11
12
# 登录页如何开启注册用户功能
在菜单参数设置修改参数键名sys.account.registerUser设置true即可。默认为false关闭。
同时在前端login.vue页面需要设置属性register注册开关为true。
export default {
  name: "Login",
  data() {
    return {
      // 注册开关
      register: true,
	  .......
2
3
4
5
6
7
# 登录页面如何不显示验证码
在菜单参数设置修改参数键名sys.account.captchaEnabled设置false即可。默认为true开启。
# 如何限制账户不允许多终端登录
这本来是一个可有可无的问题,不过经常有小伙伴有这样的需求。废话不多说,先来看同一用户不同终端限制登录的解决方法。方法很简单,大致思路就是做出userid与token(一个用户对应一个token,userid唯一)的键值对,存于缓存中。用于登录时判断用户是否在别的终端在线。详细实现代码如下:
1、application.yml新增一个配置soloLogin用于限制多终端同时登录。
# token配置
token:
    # 是否允许账户多终端同时登录(true允许 false不允许)
    soloLogin: false
2
3
4
2、Constants.java新增一个常量LOGIN_USERID_KEY公用
/**
 * 登录用户编号 redis key
 */
public static final String LOGIN_USERID_KEY = "login_userid:";
2
3
4
3、调整TokenService.java,存储&刷新缓存用户编号信息
// 是否允许账户多终端同时登录(true允许 false不允许)
@Value("${token.soloLogin}")
private boolean soloLogin;

/**
 * 删除用户身份信息
 */
public void delLoginUser(String token, Long userId)
{
	if (StringUtils.isNotEmpty(token))
	{
		String userKey = getTokenKey(token);
		redisCache.deleteObject(userKey);
	}
	if (!soloLogin && StringUtils.isNotNull(userId))
	{
		String userIdKey = getUserIdKey(userId);
		redisCache.deleteObject(userIdKey);
	}
}

/**
 * 刷新令牌有效期
 *
 * @param loginUser 登录信息
 */
public void refreshToken(LoginUser loginUser)
{
	loginUser.setLoginTime(System.currentTimeMillis());
	loginUser.setExpireTime(loginUser.getLoginTime() + expireTime * MILLIS_MINUTE);
	// 根据uuid将loginUser缓存
	String userKey = getTokenKey(loginUser.getToken());
	redisCache.setCacheObject(userKey, loginUser, expireTime, TimeUnit.MINUTES);
	if (!soloLogin)
	{
		// 缓存用户唯一标识,防止同一帐号,同时登录
		String userIdKey = getUserIdKey(loginUser.getUser().getUserId());
		redisCache.setCacheObject(userIdKey, userKey, expireTime, TimeUnit.MINUTES);
	}
}

private String getUserIdKey(Long userId)
{
	return Constants.LOGIN_USERID_KEY + userId;
}
2
3
4
5
6
7
8
9
10
11
12
13
14
15
16
17
18
19
20
21
22
23
24
25
26
27
28
29
30
31
32
33
34
35
36
37
38
39
40
41
42
43
44
45
4、自定义退出处理类LogoutSuccessHandlerImpl.java清除缓存方法添加用户编号
// 删除用户缓存记录
tokenService.delLoginUser(loginUser.getToken(), loginUser.getUser().getUserId());
2
5、登录方法SysLoginService.java,验证如果用户不允许多终端同时登录,清除缓存信息
// 是否允许账户多终端同时登录(true允许 false不允许)
@Value("${token.soloLogin}")
private boolean soloLogin;

if (!soloLogin)
{
	// 如果用户不允许多终端同时登录,清除缓存信息
	String userIdKey = Constants.LOGIN_USERID_KEY + loginUser.getUser().getUserId();
	String userKey = redisCache.getCacheObject(userIdKey);
	if (StringUtils.isNotEmpty(userKey))
	{
		redisCache.deleteObject(userIdKey);
		redisCache.deleteObject(userKey);
	}
}
2
3
4
5
6
7
8
9
10
11
12
13
14
15
# 如何区分部署多个项目的Redis缓存
如果部署了多个若依系统,连接的是同一个Redis源时会导致Key值冲突,我们可以修改Redis默认的序列化值用于区分。
1、新增RedisKeySerializer.java序列化,添加Key前缀值。
@Component
public class RedisKeySerializer implements RedisSerializer<String>
{
    @Autowired
    private RuoYiConfig config;

    private final Charset charset;

    public RedisKeySerializer()
    {
        this(Charset.forName("UTF8"));
    }

    public RedisKeySerializer(Charset charset)
    {
        Assert.notNull(charset, "字符集不允许为NULL");
        this.charset = charset;
    }

    @Override
    public byte[] serialize(String string) throws SerializationException
    {
        // 通过项目名称ruoyi.name来定义Redis前缀,用于区分项目缓存
        if (StringUtils.isNotEmpty(config.getName()))
        {
            return new StringBuilder(config.getName()).append(":").append(string).toString().getBytes(charset);
        }
        return string.getBytes(charset);
    }

    @Override
    public String deserialize(byte[] bytes) throws SerializationException
    {
        return (bytes == null ? null : new String(bytes, charset));
    }
}
2
3
4
5
6
7
8
9
10
11
12
13
14
15
16
17
18
19
20
21
22
23
24
25
26
27
28
29
30
31
32
33
34
35
36
2、修改RedisConfig.java,配置新的RedisKeySerializer。
@Bean
@SuppressWarnings(value = { "unchecked", "rawtypes" })
public RedisTemplate<Object, Object> redisTemplate(RedisConnectionFactory connectionFactory, RedisKeySerializer redisKeySerializer)
{
	....

	// 使用StringRedisSerializer来序列化和反序列化redis的key值
    template.setKeySerializer(redisKeySerializer);
    template.setValueSerializer(serializer);

    // Hash的key也采用StringRedisSerializer的序列化方式
    template.setHashKeySerializer(redisKeySerializer);
    template.setHashValueSerializer(serializer);

	template.afterPropertiesSet();
	return template;
}
2
3
4
5
6
7
8
9
10
11
12
13
14
15
16
17
3、修改CacheController.java,添加缓存Key前缀。
public static final String REDIS_NAME = "RuoYi:";

private final static List<SysCache> caches = new ArrayList<SysCache>();
{
	caches.add(new SysCache(REDIS_NAME + CacheConstants.LOGIN_TOKEN_KEY, "用户信息"));
	caches.add(new SysCache(REDIS_NAME + CacheConstants.SYS_CONFIG_KEY, "配置信息"));
	caches.add(new SysCache(REDIS_NAME + CacheConstants.SYS_DICT_KEY, "数据字典"));
	caches.add(new SysCache(REDIS_NAME + CacheConstants.CAPTCHA_CODE_KEY, "验证码"));
	caches.add(new SysCache(REDIS_NAME + CacheConstants.REPEAT_SUBMIT_KEY, "防重提交"));
	caches.add(new SysCache(REDIS_NAME + CacheConstants.RATE_LIMIT_KEY, "限流处理"));
	caches.add(new SysCache(REDIS_NAME + CacheConstants.PWD_ERR_CNT_KEY, "密码错误次数"));
}
2
3
4
5
6
7
8
9
10
11
12
此时自定义配置application.yml中的ruoyi.name就会把所有redis key加上对应的前缀。
# 前端静态资源如何整合到后端访问
分离版本都是前端和后端单独部署的,但是有些特殊情况想把前端静态资源整合到后端。提供如下方案:
1、修改ruoyi-ui中的.env.production(二选一)
// 本机地址访问
VUE_APP_BASE_API = '/'
2
// 任意地址访问
VUE_APP_BASE_API = '//localhost:8080'
2
2、修改ruoyi-ui中的router/index.js,设置mode属性为hash
export default new Router({
  mode: 'hash',
  scrollBehavior: () => ({ y: 0 }),
  routes: constantRoutes
})
2
3
4
5
3、执行bin\build.bat打包前端静态资源文件。
4、修改后端resources中的application.yml,添加thymeleaf模板引擎配置
spring:
  # 模板引擎
  thymeleaf:
    mode: HTML
    encoding: utf-8
    cache: false
2
3
4
5
6
5、修改后端ruoyi-admin/pom.xml,增加thymeleaf模板引擎依赖
<!-- spring-boot-thymeleaf -->
<dependency>
    <groupId>org.springframework.boot</groupId>
    <artifactId>spring-boot-starter-thymeleaf</artifactId>
</dependency>
2
3
4
5
6、修改后端ResourcesConfig.java中的addResourceHandlers,添加静态资源映射地址
/** 前端静态资源配置 */
registry.addResourceHandler("/static/**").addResourceLocations("classpath:/static/");
2
7、修改后端SecurityConfig.java中的configure,添加允许访问的地址。
.antMatchers(
		HttpMethod.GET,
		"/*.html",
		"/**/*.html",
		"/**/*.css",
		"/**/*.js",
		"/static/**",
		"/",
		"/index"
).permitAll()
2
3
4
5
6
7
8
9
10
8、后端新建访问控制处理IndexController.java设置对应访问页面。
import org.springframework.stereotype.Controller;
import org.springframework.web.bind.annotation.GetMapping;

@Controller
public class IndexController
{
    // 系统首页
    @GetMapping(value = { "/", "/index", "/login" })
    public String index()
    {
        return "index";
    }
}
2
3
4
5
6
7
8
9
10
11
12
13
9、整合前端dist静态资源文件到后端
后端
resources下新建templates目录,复制静态页面index.html过来。复制静态文件
static到resources目录下。
10、启动测试访问地址
打开浏览器,输入:http://localhost:8080 能正常访问和登录表示成功。
注意
由于切换成了一个应用启动前后端,所以不需要通过代理跳转,前端组件如果用到process.env.VUE_APP_BASE_API可以进行删除。防止打包部署后访问不到后端。
例如:process.env.VUE_APP_BASE_API + "/common/upload" 换成 "/common/upload",还有哪里用到了自己全局搜索一下删除。
如果嫌麻烦还有一种简单的方式,将.env.production的VUE_APP_BASE_API改成空字符串。
VUE_APP_BASE_API = '',然后将index.html移动到static目录下,同时访问地址则变成
http://localhost:8080/index.html,另外IndexController.java可以删除。
# 使用Velocity模板引擎兼容$符号
# 登录密码如何使用加密传输方式
# 如何解决多数据源事务的一致性
# 登录出现DatatypeConverter异常
错误提示:Handler dispatch failed; nested exception is java.lang.NoClassDefFoundError: javax/xml/bind/DatatypeConverter
由于>= jdk9中不再包含这个jar包,所以需要在ruoyi-common\pom.xml手动添加依赖。
<dependency>
	<groupId>javax.xml.bind</groupId>
	<artifactId>jaxb-api</artifactId>
	<version>2.3.1</version>
</dependency>
2
3
4
5
# 如何解决匿名注解启动报错
SpringBoot2.6.0默认是ant_path_matcher解析方式,但是2.6.0之后默认是path_pattern_parser解析方式。
所以导致读取注解类方法需要对应的调整,当前若依项目默认版本是2.5.x,如果使用大于2.6.x,需要将info.getPatternsCondition().getPatterns()修改为info.getPathPatternsCondition().getPatternValues()
// 获取方法上边的注解 替代path variable 为 *
Anonymous method = AnnotationUtils.findAnnotation(handlerMethod.getMethod(), Anonymous.class);
Optional.ofNullable(method).ifPresent(anonymous -> Objects.requireNonNull(info.getPathPatternsCondition().getPatternValues()) //
		.forEach(url -> urls.add(RegExUtils.replaceAll(url, PATTERN, ASTERISK))));

// 获取类上边的注解, 替代path variable 为 *
Anonymous controller = AnnotationUtils.findAnnotation(handlerMethod.getBeanType(), Anonymous.class);
Optional.ofNullable(controller).ifPresent(anonymous -> Objects.requireNonNull(info.getPathPatternsCondition().getPatternValues())
		.forEach(url -> urls.add(RegExUtils.replaceAll(url, PATTERN, ASTERISK))));
2
3
4
5
6
7
8
9
注意,如果通过配置修改了解析方式
# Spring配置
spring:
  mvc:
    pathmatch:
      matching-strategy: xxxx
2
3
4
5
处理映射匹配也需要对应的去修改
ant_path_matcher -> info.getPatternsCondition().getPatterns() path_pattern_parser -> info.getPathPatternsCondition().getPatternValues()
# 如何优雅的关闭后台系统服务
# 如何解决导出使用下载插件出现异常
# 更多项目常见问题查询
分离版本问题和不分离版本大多数雷同。