# 熔断和降级
# 基本介绍
- 什么是熔断和降级
服务的稳定是公司可持续发展的重要基石,随着业务量的快速发展,一些平时正常运行的服务,会出现各种突发状况,而且在分布式系统中,每个服务本身又存在很多不可控的因素,比如线程池处理缓慢,导致请求超时,资源不足,导致请求被拒绝,又甚至直接服务不可用、宕机、数据库挂了、缓存挂了、消息系统挂了...对于一些非核心服务,如果出现大量的异常,可以通过技术手段,对服务进行降级并提供有损服务,保证服务的柔性可用,避免引起雪崩效应。
服务熔断一般是指软件系统中,由于某些原因使得服务出现了过载现象,为防止造成整个系统故障,从而采用的一种保护措施。
服务降级是在服务器压力陡增的情况下,利用有限资源,根据当前业务情况,关闭某些服务接口或者页面,以此释放服务器资源以保证核心任务的正常运行。
- 为什么要使用熔断和降级
在一个分布式系统里,一个服务依赖多个服务,可能存在某个服务调用失败,比如超时、异常等,需要保证在一个依赖出问题的情况下,不会导致整体服务失败。
- sentinel 熔断和降级
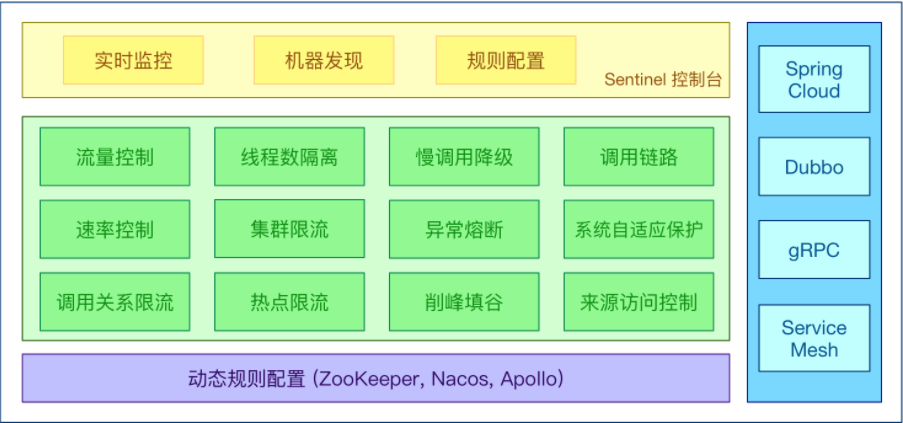
随着微服务的流行,服务和服务之间的稳定性变得越来越重要。Sentinel是面向分布式服务架构的流量控制组件,主要以流量为切入点,从流量控制、熔断降级、系统自适应保护等多个维度来帮助您保障微服务的稳定性。
sentinel具有以下特征:
丰富的应用场景: Sentinel承接了阿里巴巴近十年的双十一大促流量的核心场景,例如秒杀(即突发流量控制在系统容量可以承受的范围),消息削峰填谷,集群流量控制,实时熔断下游不可用应用等
完美的实时监控: Sentinel同时提供实时的监控功能,您可以在控制台看到接入应用的单台机器秒级数据,甚至500台一下规模的集群的汇总运行情况
广泛的开源生态: Sentinel提供开箱即用的与其他框架/库的整合模块,例如与SpringCloud,Dubbo,gRPC的整合,您只需要引入响应的依赖并进行简单的配置即可快速接入Sentinel
完美的SPI扩展点: Sentinel提供简单易用的,完美的SPI扩展接口,可以通过实现扩展接口来快速定制逻辑,例如定制规则管理,适配动态数据源等
下面是sentinel的架构图:
- 核心概念
sentinel的使用可以分为两个部分
核心库不依赖任何框架/库,能够允许在jdk7以上的版本运行时环境,同时对Dubbo、SpringCloud等框架也有比较好的支持。
控制台主要负责管理推送规则、监控、集群限流分配管理、机器发现等。
# 下载方式
注意:启动 Sentinel 控制台需要 JDK 版本为 1.8 及以上版本。
- Windows平台安装包下载
可以从https://github.com/alibaba/Sentinel/releases下载sentinel-dashboard-$version.jar包。
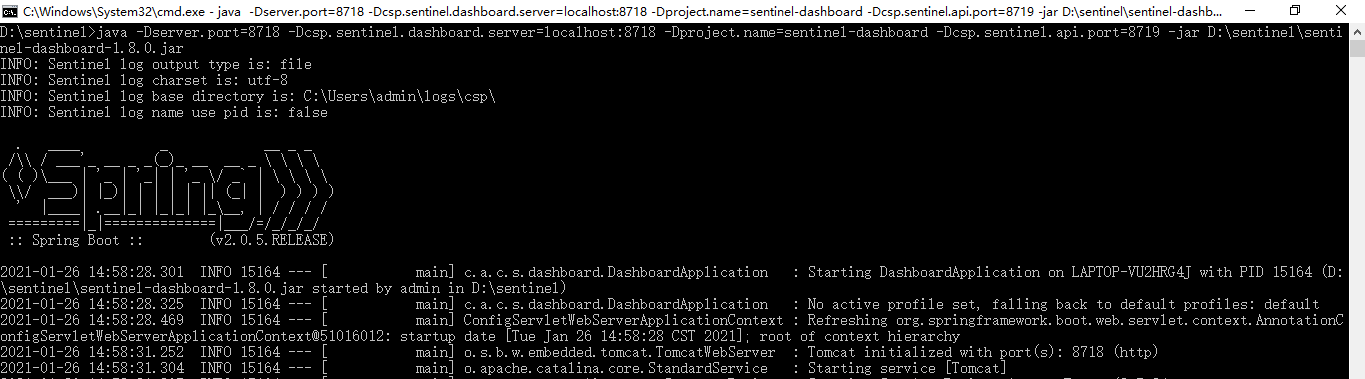
使用如下命令启动控制台:
java -Dserver.port=8718 -Dcsp.sentinel.dashboard.server=localhost:8718 -Dproject.name=sentinel-dashboard -Dcsp.sentinel.api.port=8719 -jar D:\sentinel\sentinel-dashboard-1.8.0.jar
其中-Dserver.port=8718用于指定Sentinel控制台端口为8718,F:\software\sentinel\sentinel-dashboard-1.8.0.jar为下载的包路径地址。
提示
如果觉得官网下载慢,可以使用我分享的网盘地址: https://pan.baidu.com/s/1E9J52g6uW_VFWY34fHL6zA 提取码: vneh
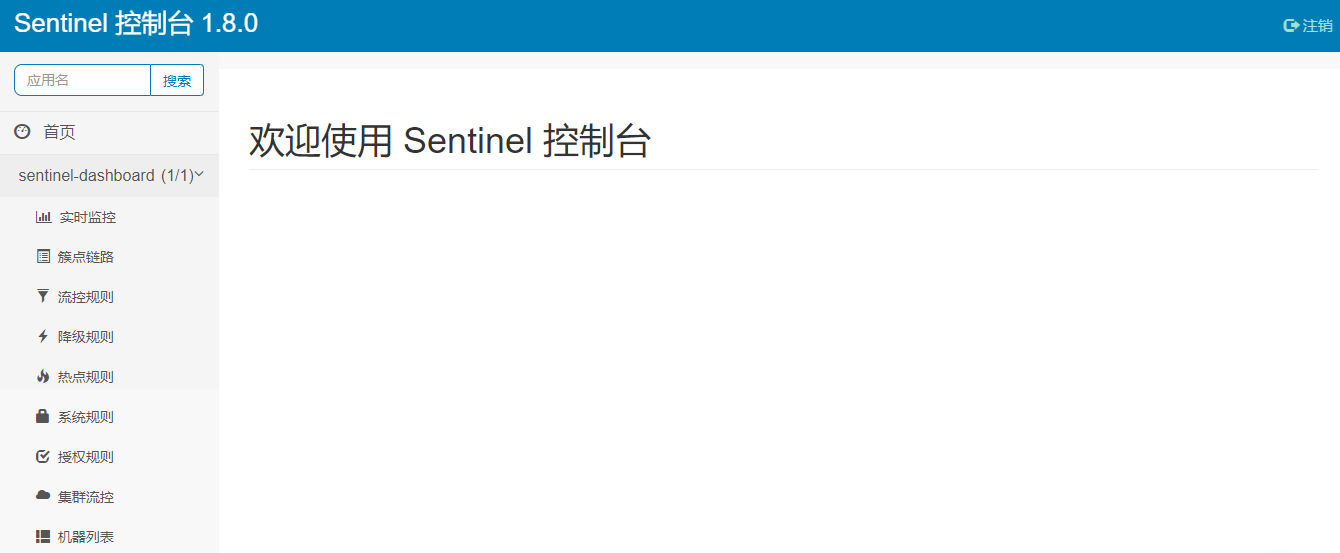
- 打开控制台
Sentinel提供了一个可视化的操作平台,安装好之后,在浏览器中输入(http://localhost:8718 (opens new window))就可以访问了,默认的用户名和密码都是sentinel(我使用的是1.8.0版本)
# 如何使用
1、添加依赖
<!-- springcloud alibaba sentinel -->
<dependency>
	<groupId>com.alibaba.cloud</groupId>
	<artifactId>spring-cloud-starter-alibaba-sentinel</artifactId>
</dependency>

<!-- SpringBoot Web -->
<dependency>
	<groupId>org.springframework.boot</groupId>
	<artifactId>spring-boot-starter-web</artifactId>
</dependency>
2
3
4
5
6
7
8
9
10
11
2、添加Sentinel配置
spring:
  application:
    # 应用名称
    name: ruoyi-xxxx
  cloud:
    sentinel:
      # 取消控制台懒加载
      eager: true
      transport:
        # 控制台地址
        dashboard: 127.0.0.1:8718
2
3
4
5
6
7
8
9
10
11
3、添加TestUserController.java,模拟接口返回用户信息。
import org.springframework.web.bind.annotation.GetMapping;
import org.springframework.web.bind.annotation.RestController;

@RestController
public class TestUserController
{
    @GetMapping("/user/info")
    public Object info()
    {
        return "{\"username\":\"admin\",\"password\":\"admin123\"}";
    }
}
2
3
4
5
6
7
8
9
10
11
12
4、在Application启动类加入注解@SpringBootApplication。
@SpringBootApplication
public class RuoYiXxxxApplication
{
    public static void main(String[] args)
    {
        SpringApplication.run(RuoYiXxxxApplication.class, args);
        System.out.println("(♥◠‿◠)ノ゙  Xxxx启动成功   ლ(´ڡ`ლ)゙  \n" +
                " .-------.       ____     __        \n" +
                " |  _ _   \\      \\   \\   /  /    \n" +
                " | ( ' )  |       \\  _. /  '       \n" +
                " |(_ o _) /        _( )_ .'         \n" +
                " | (_,_).' __  ___(_ o _)'          \n" +
                " |  |\\ \\  |  ||   |(_,_)'         \n" +
                " |  | \\ `'   /|   `-'  /           \n" +
                " |  |  \\    /  \\      /           \n" +
                " ''-'   `'-'    `-..-'              ");
    }
}
2
3
4
5
6
7
8
9
10
11
12
13
14
15
16
17
18
5、启动服务,查看Sentinel控制台的请求数据
# 定义资源
资源是Sentinel中的核心概念之一。我们说的资源,可以是任何东西,服务,服务里的方法,甚至是一段代码。最常用的资源是我们代码中的Java方法。Sentinel提供了@SentinelResource注解用于定义资源,并提供了AspectJ的扩展用于自动定义资源、处理BlockException等。
官网文档:https://github.com/alibaba/Sentinel/wiki/如何使用#定义资源
# 代码定义
@SentinelResource用于定义资源,并提供可选的异常处理和fallback配置项。
接口定义IUserService.java
/**
 * 用户接口
 *
 * @author ruoyi
 */
public interface IUserService
{
    public Object selectUserByName(String username);
}
2
3
4
5
6
7
8
9
接口实现IUserServiceImpl.java
import org.springframework.beans.factory.annotation.Autowired;
import org.springframework.context.annotation.Bean;
import org.springframework.stereotype.Service;
import org.springframework.web.client.RestTemplate;
import com.alibaba.csp.sentinel.annotation.SentinelResource;
import com.alibaba.csp.sentinel.slots.block.BlockException;

/**
 * 用户实现
 *
 * @author ruoyi
 */
@Service
public class IUserServiceImpl implements IUserService
{
    @Autowired
    private RestTemplate restTemplate;

    @Bean
    public RestTemplate restTemplate()
    {
        return new RestTemplate();
    }

    @SentinelResource(value = "selectUserByName", blockHandler = "selectUserByNameBlockHandler", fallback = "selectUserByNameFallback")
    @Override
    public Object selectUserByName(String username)
    {
        return restTemplate.getForObject("http://localhost:9201/user/info/" + username, String.class);
    }

    // 服务流量控制处理,参数最后多一个 BlockException,其余与原函数一致。
    public Object selectUserByNameBlockHandler(String username, BlockException ex)
    {
        System.out.println("selectUserByNameBlockHandler异常信息:" + ex.getMessage());
        return "{\"code\":\"500\",\"msg\": \"" + username + "服务流量控制处理\"}";
    }

    // 服务熔断降级处理,函数签名与原函数一致或加一个 Throwable 类型的参数
    public Object selectUserByNameFallback(String username, Throwable throwable)
    {
        System.out.println("selectUserByNameFallback异常信息:" + throwable.getMessage());
        return "{\"code\":\"500\",\"msg\": \"" + username + "服务熔断降级处理\"}";
    }

}
2
3
4
5
6
7
8
9
10
11
12
13
14
15
16
17
18
19
20
21
22
23
24
25
26
27
28
29
30
31
32
33
34
35
36
37
38
39
40
41
42
43
44
45
46
测试接口请求TestUserController.java
import org.springframework.beans.factory.annotation.Autowired;
import org.springframework.web.bind.annotation.GetMapping;
import org.springframework.web.bind.annotation.PathVariable;
import org.springframework.web.bind.annotation.RestController;

@RestController
public class TestUserController
{
    @Autowired
    private IUserService userService;

    @GetMapping("/info/{username}")
    public Object info(@PathVariable("username") String username)
    {
        return userService.selectUserByName(username);
    }
}
2
3
4
5
6
7
8
9
10
11
12
13
14
15
16
17
# 属性说明
@SentinelResource注解包含以下属性:
| 参数 | 描述 |
|---|---|
| value | 资源名称,必需项(不能为空) |
| entryType | 资源调用方向,可选项(默认为EntryType.OUT) |
| resourceType | 资源的分类 |
| blockHandler | 对应处理BlockException的函数名称 |
| blockHandlerClass | 处理类的Class对象,函数必需为static函数 |
| fallback | 用于在抛出异常的时候提供fallback处理逻辑 |
| defaultFallback | 用作默认的回退的方法 |
| fallbackClass | 异常类的Class对象,函数必需为static函数 |
| exceptionsToTrace | 异常类跟踪列表(默认为Throwable.class) |
| exceptionsToIgnore | 排除掉的异常类型 |
提示
注意:注解方式埋点不支持 private 方法。
# 流量规则
# 控制台定义
选择流控规则,新增流控规则,填入对应信息。
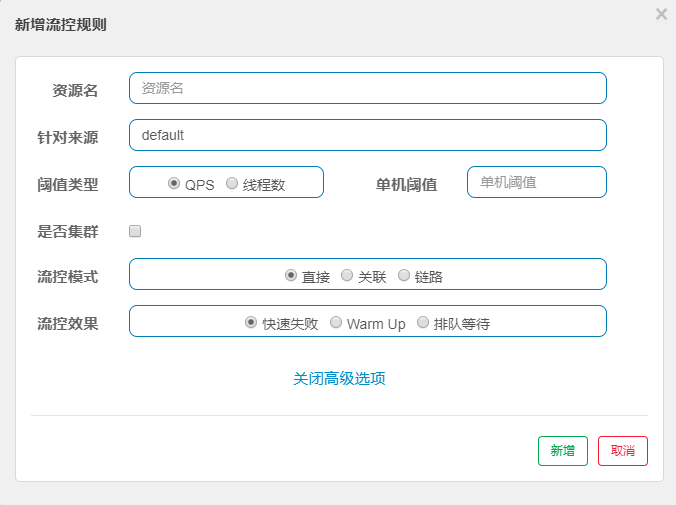
- 资源名: 唯一名称,默认请求路径
- 针对来源: Sentinel可以针对调用者进行限流,填写微服务名,默认default(不区分来源)
- 阈值类型/单机阈值:
- QPS(每秒请求数量):当调用该api的QPS达到阈值的时候,进行限流
- 线程数:当调用该api的线程数达到阈值的时候,进行限流
- 是否集群: 不需要集群
- 流控模式:
- 直接:api达到限流条件时,直接限流
- 关联:当关联的资源达到限流阈值时,就限流自己
- 链路:只记录指定链路上的流量(指定资源从入口资源进来的流量,如果达到峰值,就进行限流)【api级别的针对来源】
- 流控效果:
- 快速失败:直接失败,抛异常
- Warm Up:根据coldFactor(冷加载因子,默认3)的值,从阈值/coldFactor,经过预热时长,才达到设置的QPS阈值
- 排队等待:匀速排队,让请求以匀速通过,阈值类型必须设置为QPS,否则无效
# 代码定义
理解上面规则的定义之后,我们可以通过调用FlowRuleManager.loadRules()方法来用硬编码的方式定义流量控制规则,比如:
private void initFlowQpsRule() {
    List<FlowRule> rules = new ArrayList<>();
    FlowRule rule = new FlowRule(resourceName);
    // set limit qps to 20
    rule.setCount(20);
    rule.setGrade(RuleConstant.FLOW_GRADE_QPS);
    rule.setLimitApp("default");
    rules.add(rule);
    FlowRuleManager.loadRules(rules);
}
2
3
4
5
6
7
8
9
10
# 属性说明
流量控制规则(FlowRule)重要属性
| 参数 | 描述 | 描述 |
|---|---|---|
| resource | 资源名,资源名是限流规则的作用对象 | |
| limitApp | 流控针对的调用来源,若为 default 则不区分调用来源 | default,代表不区分调用来源 |
| grade | 限流阈值类型,QPS 模式(1)或并发线程数模式(0) | QPS 模式 |
| count | 限流阈值 | |
| strategy | 调用关系限流策略:直接、链路、关联 | 根据资源本身(直接) |
| controlBehavior | 流量控制效果(直接拒绝、Warm Up、匀速排队) | 直接拒绝 |
| clusterMode | 是否集群限流 | 否 |
同一个资源可以同时有多个限流规则,检查规则时会依次检查。
提示
从1.6.3版本开始,Sentinel Web filter默认收敛所有URL的入口context,因此链路限流不生效。1.7.0版本开始(对应SCA 2.1.1.RELEASE),我们在CommonFilter引入了WEB_CONTEXT_UNIFY这个init parameter,用于控制是否收敛context。将其配置为false即可根据不同的URL进行链路限流。
参考:https://github.com/alibaba/sentinel/issues/1213
# 降级规则
现代微服务架构都是分布式的,由非常多的服务组成。不同服务之间相互调用,组成复杂的调用链路。以上的问题在链路调用中会产生放大的效果。复杂链路上的某一环不稳定,就可能会层层级联,最终导致整个链路都不可用。因此我们需要对不稳定的弱依赖服务调用进行熔断降级,暂时切断不稳定调用,避免局部不稳定因素导致整体的雪崩。熔断降级作为保护自身的手段,通常在客户端(调用端)进行配置。
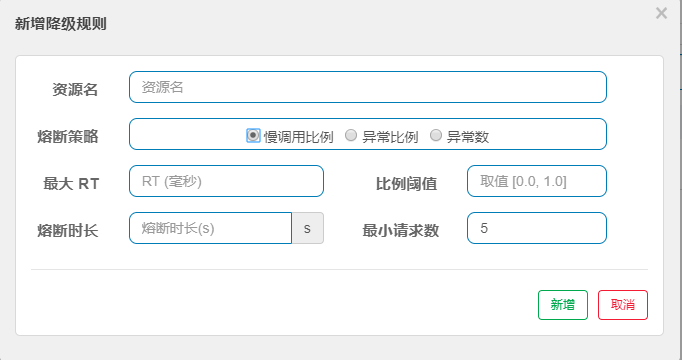
# 控制台定义
选择降级规则,新增降级规则,填入对应信息。
# 代码定义
private void initDegradeRule() {
    List<DegradeRule> rules = new ArrayList<>();
    DegradeRule rule = new DegradeRule();
    rule.setResource(KEY);
    // set threshold RT, 10 ms
    rule.setCount(10);
    rule.setGrade(RuleConstant.DEGRADE_GRADE_RT);
    rule.setTimeWindow(10);
    rules.add(rule);
    DegradeRuleManager.loadRules(rules);
}
2
3
4
5
6
7
8
9
10
11
# 属性说明
熔断降级规则(DegradeRule)重要属性
| 参数 | 描述 | 描述 |
|---|---|---|
| resource | 资源名,即规则的作用对象 | |
| grade | 熔断策略,支持慢调用比例/异常比例/异常数策略 | 慢调用比例 |
| count | 慢调用比例模式下为慢调用临界 RT(超出该值计为慢调用);异常比例/异常数模式下为对应的阈值 | |
| timeWindow | 熔断时长,单位为 s | |
| minRequestAmount | 熔断触发的最小请求数,请求数小于该值时即使异常比率超出阈值也不会熔断(1.7.0 引入) | 5 |
| statIntervalMs | 统计时长(单位为 ms),如 60*1000 代表分钟级(1.8.0 引入) | 1000 ms |
| slowRatioThreshold | 慢调用比例阈值,仅慢调用比例模式有效(1.8.0 引入) |
同一个资源可以同时有多个降级规则。
# 动态配置规则
上面的规则配置,都是存在内存中的。即如果应用重启,这个规则就会失效,可以整合动态配置系统,如ZooKeeper、Nacos、Apollo等,动态地实时刷新配置规则。
# 文件配置规则
Sentinel支持通过本地文件加载规则配置,使用方式如下(限流规则作为演示)
spring:
  cloud:
    sentinel:
      datasource:
        ds1:
          file:
            file: classpath:flowRule.json
            data-type: json
            rule-type: flow
2
3
4
5
6
7
8
9
flowRule.json对应com.alibaba.csp.sentinel.slots.block.flow.FlowRule各属性。
[
  {
    "resource": "selectUserByName",
    "count": 1,
    "grade": 1,
    "limitApp": "default",
    "strategy": 0,
    "controlBehavior": 0
  }
]
2
3
4
5
6
7
8
9
10
# Nacos配置规则
当sentinel重新启动时,sentinel dashboard中原来的数据将会全部消失,这样就需要重新定义限流规则,无疑是不可取的。所以需要将sentinel中定义的限流规则保存到配置中心里面。
具体的实现方法如下:
1、在nacos中定义自定义限流策略sentinel-ruoyi-xxxx
[
  {
    "resource": "selectUserByName",
    "count": 2,
    "grade": 1,
    "limitApp": "default",
    "strategy": 0,
    "controlBehavior": 0
  }
]
2
3
4
5
6
7
8
9
10
2、添加依赖
<!-- springcloud alibaba nacos config -->
<dependency>
	<groupId>com.alibaba.cloud</groupId>
	<artifactId>spring-cloud-starter-alibaba-nacos-config</artifactId>
</dependency>

<!-- sentinel datasource nacos -->
<dependency>
	<groupId>com.alibaba.csp</groupId>
	<artifactId>sentinel-datasource-nacos</artifactId>
</dependency>
2
3
4
5
6
7
8
9
10
11
3、添加相关配置,sentinel下面的dataSource中配置nacos
spring:
  application:
    # 应用名称
    name: ruoyi-xxxx
  cloud:
    nacos:
      config:
        # 配置中心地址
        server-addr: 127.0.0.1:8848
        # 配置文件格式
        file-extension: yml
        # 共享配置
        shared-configs:
          - application-${spring.profiles.active}.${spring.cloud.nacos.config.file-extension}
    sentinel:
      # 取消控制台懒加载
      eager: true
      transport:
        # 控制台地址
        dashboard: 127.0.0.1:8718
      # nacos配置持久化
      datasource:
        ds1:
          nacos:
            server-addr: 127.0.0.1:8848
            dataId: sentinel-ruoyi-gateway
            groupId: DEFAULT_GROUP
            data-type: json
            rule-type: flow
2
3
4
5
6
7
8
9
10
11
12
13
14
15
16
17
18
19
20
21
22
23
24
25
26
27
28
29
4、启动sentinel应用,可以看到我们在nacos中配置的限流规则
# RestTemplate 支持
Spring Cloud Alibaba Sentinel支持对RestTemplate调用的服务进行服务保护。需要在构造RestTemplate Bean时添加@SentinelRestTemplate注解。
RestTemplate添加@SentinelRestTemplate注解保护支持。
@Bean
@SentinelRestTemplate(blockHandler = "handleException", blockHandlerClass = ExceptionUtil.class, fallback = "fallback", fallbackClass = ExceptionUtil.class)
public RestTemplate restTemplate() {
	return new RestTemplate();
}
2
3
4
5
服务熔断处理类ExceptionUtil.java,必须使用静态方法。
import com.alibaba.cloud.sentinel.rest.SentinelClientHttpResponse;
import com.alibaba.csp.sentinel.slots.block.BlockException;
import org.springframework.http.HttpRequest;
import org.springframework.http.client.ClientHttpRequestExecution;
import org.springframework.http.client.ClientHttpResponse;

public class ExceptionUtil
{
    // 服务流量控制处理
    public static ClientHttpResponse handleException(HttpRequest request, byte[] body,
            ClientHttpRequestExecution execution, BlockException exception)
    {
        exception.printStackTrace();
        return new SentinelClientHttpResponse("{\"code\":\"500\",\"msg\": \"服务流量控制处理\"}");
    }

    // 服务熔断降级处理
    public static ClientHttpResponse fallback(HttpRequest request, byte[] body, ClientHttpRequestExecution execution,
            BlockException exception)
    {
        exception.printStackTrace();
        return new SentinelClientHttpResponse("{\"code\":\"500\",\"msg\": \"服务熔断降级处理\"}");
    }
}
2
3
4
5
6
7
8
9
10
11
12
13
14
15
16
17
18
19
20
21
22
23
24
# OpenFeign 支持
其实不管是Hystrix还是Sentinel对于Feign的支持,核心代码基本上是一致的,只需要修改依赖和配置文件即可。
1、添加依赖
<!-- SpringCloud Alibaba Nacos -->
<dependency>
	<groupId>com.alibaba.cloud</groupId>
	<artifactId>spring-cloud-starter-alibaba-nacos-discovery</artifactId>
</dependency>

<!-- spring cloud openfeign 依赖 -->
<dependency>
    <groupId>org.springframework.cloud</groupId>
    <artifactId>spring-cloud-starter-openfeign</artifactId>
</dependency>
2
3
4
5
6
7
8
9
10
11
2、feign开启sentinel支持
spring:
  cloud:
    nacos:
      discovery:
        # 服务注册地址
        server-addr: 127.0.0.1:8848

feign:
  sentinel:
    enabled: true
2
3
4
5
6
7
8
9
10
3、测试用户服务类RemoteUserService.java
import org.springframework.cloud.openfeign.FeignClient;
import org.springframework.web.bind.annotation.GetMapping;
import org.springframework.web.bind.annotation.PathVariable;

/**
 * 用户服务
 *
 * @author ruoyi
 */
@FeignClient(contextId = "remoteUserService", value = "ruoyi-system", fallbackFactory = RemoteUserFallbackFactory.class)
public interface RemoteUserService
{
    /**
     * 通过用户名查询用户信息
     *
     * @param username 用户名
     * @return 结果
     */
    @GetMapping(value = "/user/info/{username}")
    public Object getUserInfo(@PathVariable("username") String username);
}
2
3
4
5
6
7
8
9
10
11
12
13
14
15
16
17
18
19
20
21
4、降级用户服务类处理RemoteUserFallbackFactory.java
import org.slf4j.Logger;
import org.slf4j.LoggerFactory;
import org.springframework.stereotype.Component;
import feign.hystrix.FallbackFactory;

/**
 * 用户服务降级处理
 *
 * @author ruoyi
 */
@Component
public class RemoteUserFallbackFactory implements FallbackFactory<RemoteUserService>
{
    private static final Logger log = LoggerFactory.getLogger(RemoteUserFallbackFactory.class);

    @Override
    public RemoteUserService create(Throwable throwable)
    {
        log.error("用户服务调用失败:{}", throwable.getMessage());
        return new RemoteUserService()
        {
            @Override
            public Object getUserInfo(String username)
            {
                return "{\"code\":\"500\",\"msg\": \"用户服务熔断降级处理\"}";
            }
        };
    }
}
2
3
4
5
6
7
8
9
10
11
12
13
14
15
16
17
18
19
20
21
22
23
24
25
26
27
28
29
5、启动类扫描配置
@EnableFeignClients(basePackages = "com.ruoyi")
创建的类需要在resources\META-INF下的spring.factories配置加载自动装配类
org.springframework.boot.autoconfigure.EnableAutoConfiguration=\
  .....
  com.ruoyi.system.api.factory.RemoteUserFallbackFactory
2
3