# 系统接口
# 基本介绍
# 如何使用
springdoc方式,ruoyi-cloud版本 > 3.6.4 使用
1、添加依赖
<!-- RuoYi Common Swagger -->
<dependency>
	<groupId>com.ruoyi</groupId>
	<artifactId>ruoyi-common-swagger</artifactId>
</dependency>
2
3
4
5
2、在application.yml添加服务配置
server:
  port: 6666

spring:
  application:
    name: ruoyi-xxxx

# springdoc配置
springdoc:
  # 通过网关使用地址
  # gatewayUrl: http://localhost:8080/${spring.application.name}
  # 单独运行使用本机
  gatewayUrl: http://localhost:6666
  api-docs:
    # 是否开启接口文档
    enabled: true
  info:
    # 标题
    title: '测试接口文档'
    # 描述
    description: '测试接口描述'
    # 作者信息
    contact:
      name: RuoYi
      url: https://ruoyi.vip
2
3
4
5
6
7
8
9
10
11
12
13
14
15
16
17
18
19
20
21
22
23
24
25
3、在Application启动类加入注解@SpringBootApplication。
@SpringBootApplication
public class RuoYiSwaggerApplication
{
    public static void main(String[] args)
    {
        SpringApplication.run(RuoYiSwaggerApplication.class, args);
        System.out.println("(♥◠‿◠)ノ゙  Swagger启动成功   ლ(´ڡ`ლ)゙  \n" +
                " .-------.       ____     __        \n" +
                " |  _ _   \\      \\   \\   /  /    \n" +
                " | ( ' )  |       \\  _. /  '       \n" +
                " |(_ o _) /        _( )_ .'         \n" +
                " | (_,_).' __  ___(_ o _)'          \n" +
                " |  |\\ \\  |  ||   |(_,_)'         \n" +
                " |  | \\ `'   /|   `-'  /           \n" +
                " |  |  \\    /  \\      /           \n" +
                " ''-'   `'-'    `-..-'              ");
    }
}
2
3
4
5
6
7
8
9
10
11
12
13
14
15
16
17
18
swagger方式,ruoyi-cloud版本 < 3.6.4 使用
1、添加依赖
<!-- SpringBoot Web -->
<dependency>
	<groupId>org.springframework.boot</groupId>
	<artifactId>spring-boot-starter-web</artifactId>
</dependency>

<!-- Swagger -->
<dependency>
	<groupId>io.springfox</groupId>
	<artifactId>springfox-swagger2</artifactId>
	<version>${swagger.fox.version}</version>
</dependency>

<!-- Swagger UI -->
<dependency>
	<groupId>io.springfox</groupId>
	<artifactId>springfox-swagger-ui</artifactId>
	<version>${swagger.fox.version}</version>
</dependency>
2
3
4
5
6
7
8
9
10
11
12
13
14
15
16
17
18
19
2、在application.yml添加服务配置
server:
  port: 6666

spring:
  application:
    name: ruoyi-xxxx
2
3
4
5
6
3、在Application启动类加入注解@SpringBootApplication和@EnableSwagger2。
@EnableSwagger2
@SpringBootApplication
public class RuoYiSwaggerApplication
{
    public static void main(String[] args)
    {
        SpringApplication.run(RuoYiSwaggerApplication.class, args);
        System.out.println("(♥◠‿◠)ノ゙  Swagger启动成功   ლ(´ڡ`ლ)゙  \n" +
                " .-------.       ____     __        \n" +
                " |  _ _   \\      \\   \\   /  /    \n" +
                " | ( ' )  |       \\  _. /  '       \n" +
                " |(_ o _) /        _( )_ .'         \n" +
                " | (_,_).' __  ___(_ o _)'          \n" +
                " |  |\\ \\  |  ||   |(_,_)'         \n" +
                " |  | \\ `'   /|   `-'  /           \n" +
                " |  |  \\    /  \\      /           \n" +
                " ''-'   `'-'    `-..-'              ");
    }
}
2
3
4
5
6
7
8
9
10
11
12
13
14
15
16
17
18
19
4、添加TestUserController.java,模拟接口返回用户信息。
import org.springframework.web.bind.annotation.GetMapping;
import org.springframework.web.bind.annotation.RestController;

@RestController
public class TestUserController
{
    @GetMapping("/user/info")
    public Object info()
    {
        return "{\"username\":\"admin\",\"password\":\"admin123\"}";
    }
}
2
3
4
5
6
7
8
9
10
11
12
5、访问http://localhost:6666/swagger-ui/index.html,测试验证接口返回正确数据表示测试通过。
# 接口模块
项目中存在ruoyi-common-swagger模块,可以直接依赖后使用。
1、业务模块添加依赖
<!-- ruoyi common swagger -->
<dependency>
	<groupId>com.ruoyi</groupId>
	<artifactId>ruoyi-common-swagger</artifactId>
</dependency>
2
3
4
5
2、在ruoyi-xxxx-dev.yml添加接口配置
springdoc方式,ruoyi-cloud版本 > 3.6.4 使用
# springdoc配置
springdoc:
  # 通过网关使用地址
  # gatewayUrl: http://localhost:8080/${spring.application.name}
  # 单独运行使用本机
  gatewayUrl: http://localhost:6666
  api-docs:
    # 是否开启接口文档
    enabled: true
  info:
    # 标题
    title: '测试接口文档'
    # 描述
    description: '测试接口描述'
    # 作者信息
    contact:
      name: RuoYi
      url: https://ruoyi.vip
2
3
4
5
6
7
8
9
10
11
12
13
14
15
16
17
18
swagger方式,ruoyi-cloud版本 < 3.6.4 使用
# swagger配置
swagger:
  title: 系统模块接口文档
  license: Powered By ruoyi
  licenseUrl: https://ruoyi.vip
2
3
4
5
ruoyi-cloud版本 < 3.6.4 使用swagger配置,ruoyi-cloud版本 > 3.6.4 使用 springdoc配置
3、在Application启动类加入系统接口注解@EnableCustomSwagger2
@EnableCustomConfig
@EnableCustomSwagger2
@EnableRyFeignClients
@SpringCloudApplication
public class RuoYiSystemApplication
{
    public static void main(String[] args)
    {
        SpringApplication.run(RuoYiSystemApplication.class, args);
        System.out.println("(♥◠‿◠)ノ゙  系统模块启动成功   ლ(´ڡ`ლ)゙  \n" +
                " .-------.       ____     __        \n" +
                " |  _ _   \\      \\   \\   /  /    \n" +
                " | ( ' )  |       \\  _. /  '       \n" +
                " |(_ o _) /        _( )_ .'         \n" +
                " | (_,_).' __  ___(_ o _)'          \n" +
                " |  |\\ \\  |  ||   |(_,_)'         \n" +
                " |  | \\ `'   /|   `-'  /           \n" +
                " |  |  \\    /  \\      /           \n" +
                " ''-'   `'-'    `-..-'              ");
    }
}
2
3
4
5
6
7
8
9
10
11
12
13
14
15
16
17
18
19
20
21
注意:使用新版本springdoc方式已经无需加入@EnableCustomSwagger2注解
4、测试验证
访问http://{ip}:{port}/swagger-ui/index.html地址,出现如下图表示成功。

# 接口聚合
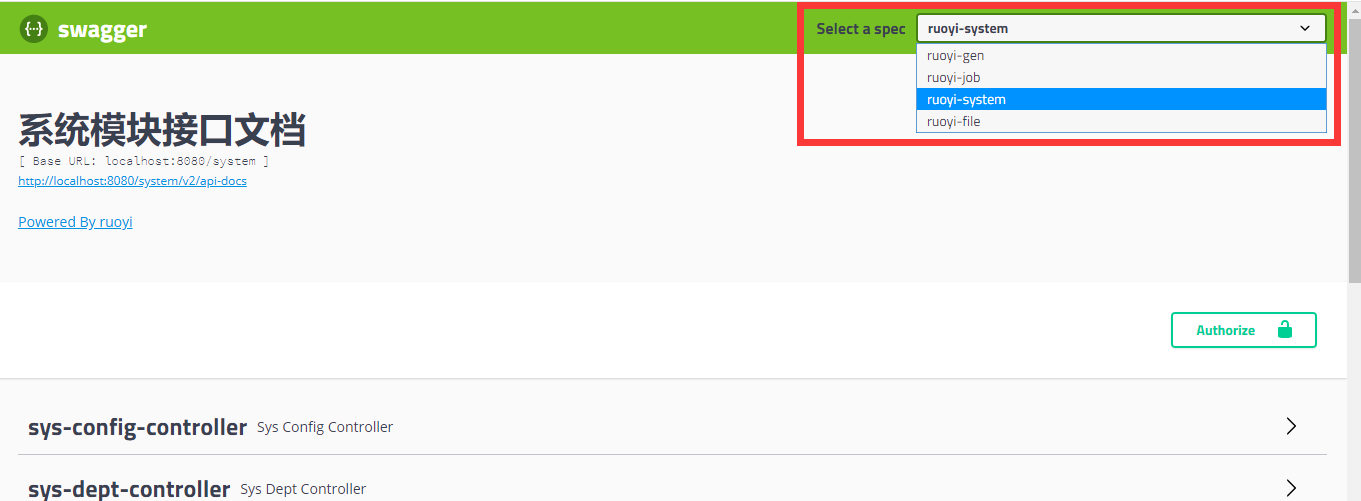
访问swagger-ui.html的时候会发现右上角的Select a spec这个下拉选项

当启动一个springboot项目的时候会发现这个下拉选项毫无用处,不过它的强大是在于这个下拉可以用来切换不同项目的swagger接口地址,这就实现了使用一个网关的url访问所有的项目接口。
1、网关模块添加依赖
<!-- SpringCloud Gateway -->
<dependency>
	<groupId>org.springframework.cloud</groupId>
	<artifactId>spring-cloud-starter-gateway</artifactId>
</dependency>

<!-- SpringCloud Alibaba Nacos -->
<dependency>
	<groupId>com.alibaba.cloud</groupId>
	<artifactId>spring-cloud-starter-alibaba-nacos-discovery</artifactId>
</dependency>

<!-- Swagger UI -->
<dependency>
	<groupId>io.springfox</groupId>
	<artifactId>springfox-swagger-ui</artifactId>
	<version>${swagger.fox.version}</version>
</dependency>

<!-- Swagger -->
<dependency>
	<groupId>io.springfox</groupId>
	<artifactId>springfox-swagger2</artifactId>
	<version>${swagger.fox.version}</version>
</dependency>
2
3
4
5
6
7
8
9
10
11
12
13
14
15
16
17
18
19
20
21
22
23
24
25
2、网关服务创建一个类SwaggerProvider.java实现SwaggerResourcesProvider
package com.ruoyi.gateway.config;

import java.util.ArrayList;
import java.util.List;
import org.springframework.beans.factory.annotation.Autowired;
import org.springframework.cloud.gateway.config.GatewayProperties;
import org.springframework.cloud.gateway.route.RouteLocator;
import org.springframework.cloud.gateway.support.NameUtils;
import org.springframework.stereotype.Component;
import springfox.documentation.swagger.web.SwaggerResource;
import springfox.documentation.swagger.web.SwaggerResourcesProvider;

/**
 * 聚合系统接口
 *
 * @author ruoyi
 */
@Component
public class SwaggerProvider implements SwaggerResourcesProvider
{
    /**
     * Swagger2默认的url后缀
     */
    public static final String SWAGGER2URL = "/v2/api-docs";
    /**
     * 网关路由
     */
    @Autowired
    private RouteLocator routeLocator;

    @Autowired
    private GatewayProperties gatewayProperties;

    /**
     * 聚合其他服务接口
     *
     * @return
     */
    @Override
    public List<SwaggerResource> get()
    {
        List<SwaggerResource> resourceList = new ArrayList<>();
        List<String> routes = new ArrayList<>();
        // 获取网关中配置的route
        routeLocator.getRoutes().subscribe(route -> routes.add(route.getId()));
        gatewayProperties.getRoutes().stream()
                .filter(routeDefinition -> routes
                        .contains(routeDefinition.getId()))
                .forEach(routeDefinition -> routeDefinition.getPredicates().stream()
                        .filter(predicateDefinition -> "Path".equalsIgnoreCase(predicateDefinition.getName()))
                        .filter(predicateDefinition -> !"ruoyi-auth".equalsIgnoreCase(routeDefinition.getId()))
                        .forEach(predicateDefinition -> resourceList
                                .add(swaggerResource(routeDefinition.getId(), predicateDefinition.getArgs()
                                        .get(NameUtils.GENERATED_NAME_PREFIX + "0").replace("/**", SWAGGER2URL)))));
        return resourceList;
    }

    private SwaggerResource swaggerResource(String name, String location)
    {
        SwaggerResource swaggerResource = new SwaggerResource();
        swaggerResource.setName(name);
        swaggerResource.setLocation(location);
        swaggerResource.setSwaggerVersion("2.0");
        return swaggerResource;
    }
}
2
3
4
5
6
7
8
9
10
11
12
13
14
15
16
17
18
19
20
21
22
23
24
25
26
27
28
29
30
31
32
33
34
35
36
37
38
39
40
41
42
43
44
45
46
47
48
49
50
51
52
53
54
55
56
57
58
59
60
61
62
63
64
65
66
3、创建一个聚合接口类SwaggerHandler.java
package com.ruoyi.gateway.handler;

import java.util.Optional;
import org.springframework.beans.factory.annotation.Autowired;
import org.springframework.http.HttpStatus;
import org.springframework.http.ResponseEntity;
import org.springframework.web.bind.annotation.GetMapping;
import org.springframework.web.bind.annotation.RequestMapping;
import org.springframework.web.bind.annotation.RestController;
import reactor.core.publisher.Mono;
import springfox.documentation.swagger.web.SecurityConfiguration;
import springfox.documentation.swagger.web.SecurityConfigurationBuilder;
import springfox.documentation.swagger.web.SwaggerResourcesProvider;
import springfox.documentation.swagger.web.UiConfiguration;
import springfox.documentation.swagger.web.UiConfigurationBuilder;

@RestController
@RequestMapping("/swagger-resources")
public class SwaggerHandler
{
    @Autowired(required = false)
    private SecurityConfiguration securityConfiguration;

    @Autowired(required = false)
    private UiConfiguration uiConfiguration;

    private final SwaggerResourcesProvider swaggerResources;

    @Autowired
    public SwaggerHandler(SwaggerResourcesProvider swaggerResources)
    {
        this.swaggerResources = swaggerResources;
    }

    @GetMapping("/configuration/security")
    public Mono<ResponseEntity<SecurityConfiguration>> securityConfiguration()
    {
        return Mono.just(new ResponseEntity<>(
                Optional.ofNullable(securityConfiguration).orElse(SecurityConfigurationBuilder.builder().build()),
                HttpStatus.OK));
    }

    @GetMapping("/configuration/ui")
    public Mono<ResponseEntity<UiConfiguration>> uiConfiguration()
    {
        return Mono.just(new ResponseEntity<>(
                Optional.ofNullable(uiConfiguration).orElse(UiConfigurationBuilder.builder().build()), HttpStatus.OK));
    }

    @SuppressWarnings("rawtypes")
    @GetMapping("")
    public Mono<ResponseEntity> swaggerResources()
    {
        return Mono.just((new ResponseEntity<>(swaggerResources.get(), HttpStatus.OK)));
    }
}
2
3
4
5
6
7
8
9
10
11
12
13
14
15
16
17
18
19
20
21
22
23
24
25
26
27
28
29
30
31
32
33
34
35
36
37
38
39
40
41
42
43
44
45
46
47
48
49
50
51
52
53
54
55
56
4、配置注册中心及路由信息
spring:
  application:
    name: ruoyi-swagger-test
  cloud:
    nacos:
      discovery:
        # 服务注册地址
        server-addr: 127.0.0.1:8848
    gateway:
      routes:
        # 认证中心
        - id: ruoyi-auth
          uri: lb://ruoyi-auth
          predicates:
            - Path=/auth/**
          filters:
            - StripPrefix=1
        # 系统模块
        - id: ruoyi-system
          uri: lb://ruoyi-system
          predicates:
            - Path=/system/**
          filters:
            - StripPrefix=1
        # 代码生成
        - id: ruoyi-gen
          uri: lb://ruoyi-gen
          predicates:
            - Path=/code/**
          filters:
            - StripPrefix=1
        # 定时任务
        - id: ruoyi-job
          uri: lb://ruoyi-job
          predicates:
            - Path=/schedule/**
          filters:
            - StripPrefix=1
        # 文件服务
        - id: ruoyi-file
          uri: lb://ruoyi-file
          predicates:
            - Path=/file/**
          filters:
            - StripPrefix=1
2
3
4
5
6
7
8
9
10
11
12
13
14
15
16
17
18
19
20
21
22
23
24
25
26
27
28
29
30
31
32
33
34
35
36
37
38
39
40
41
42
43
44
45
5、测试验证
打开浏览器,输入:(http://localhost:8080/swagger-ui/index.html (opens new window))

选择切换不同服务的swagger接口
新版本springdoc方式
注意新版本是ruoyi-gateway中通过SpringDocConfig.java配置类同步聚合,其他相关接口代码参考ruoyi-common-swagger模块。
# 全局授权
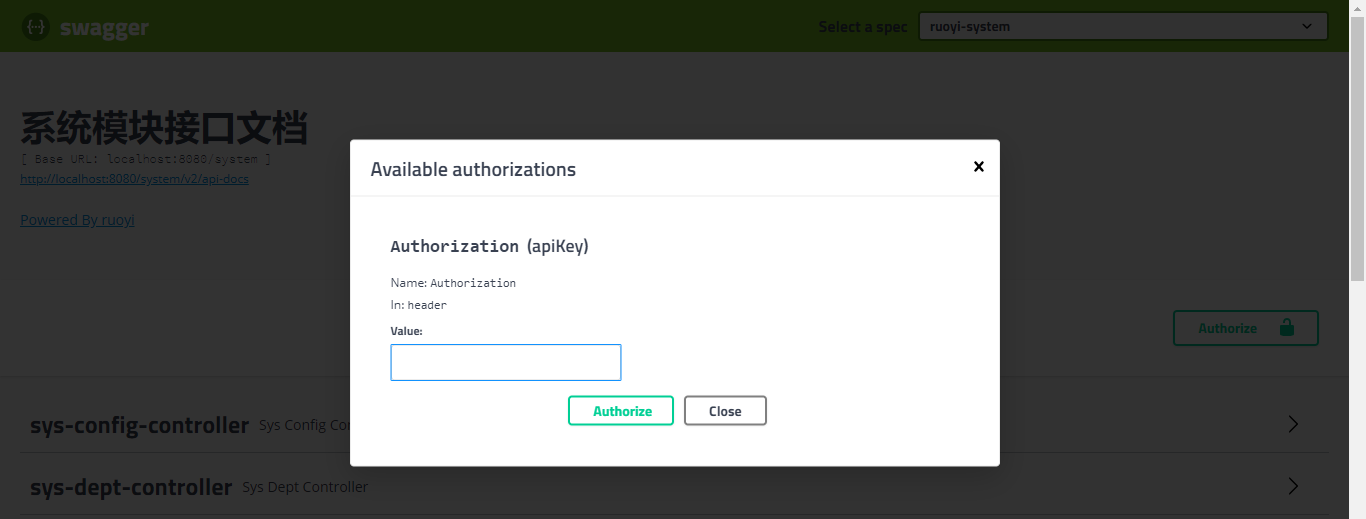
在测试系统接口中可能存在一些接口用到用户信息或权限验证,此时需要添加全局的token参数。如图

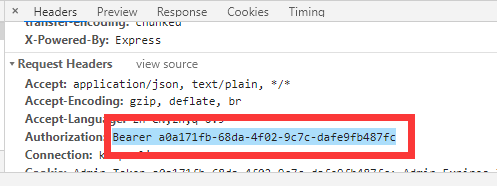
token是在登录成功后返回的,可以在浏览器通过F12查看Network中的请求地址,对应参数Authorization。复制截图内容到swagger全局Authorization属性value参数中,点击Authorize,以后每次访问接口会携带此token信息。

# 整合knife4j
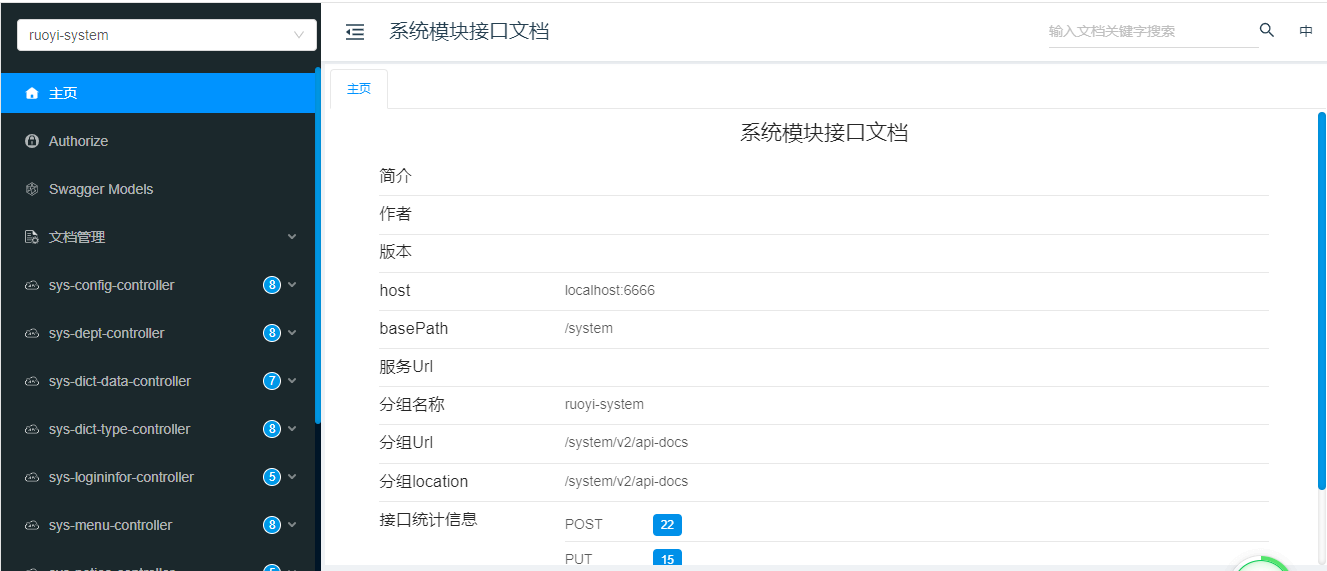
Knife4j是一个集Swagger2和OpenAPI3为一体的增强解决方案。基础ui组件支持(自定义文档、动态参数调试、I18n、接口排序、导出等)。
springdoc方式,ruoyi-cloud版本 > 3.6.4 使用
1、在ruoyi-gateway加入webflux-core和knife4j-gateway依赖,删除原有的springdoc-openapi-webflux-ui避免冲突。
<!-- Springdoc -->
<dependency>
	<groupId>org.springdoc</groupId>
	<artifactId>springdoc-openapi-webflux-core</artifactId>
	<version>${springdoc.version}</version>
</dependency>

<!--引入Knife4j的gateway包-->
<dependency>
	<groupId>com.github.xiaoymin</groupId>
	<artifactId>knife4j-gateway-spring-boot-starter</artifactId>
	<version>4.5.0</version>
</dependency>
2
3
4
5
6
7
8
9
10
11
12
13
2、在ruoyi-common-swagger系统接口模块下,把knife4j依赖资源引入
<!-- knife4j -->
<dependency>
	<groupId>io.springboot</groupId>
	<artifactId>knife4j-openapi3-ui</artifactId>
	<version>4.5.0</version>
</dependency>
2
3
4
5
6
3、在其他ruoyi-xxxx-xxxx服务下,把ruoyi-common-swagger依赖资源引入
<!-- RuoYi Common Swagger -->
<dependency>
	<groupId>com.ruoyi</groupId>
	<artifactId>ruoyi-common-swagger</artifactId>
</dependency>
2
3
4
5
4、在网关的bootstrap.yml或nacos中的ruoyi-gateway-dev.yml中加入配置,以便网关聚合访问文档。
knife4j:
  gateway:
    enabled: true
    tags-sorter: order
    operations-sorter: order
    strategy: manual
    routes:
      - name: 系统模块
        url: /ruoyi-system/v3/api-docs?group=default
        service-name: ruoyi-system
        context-path: /ruoyi-system
        order: 1
      - name: 代码生成
        url: /ruoyi-gen/v3/api-docs?group=default
        service-name: ruoyi-gen
        context-path: /ruoyi-gen
        order: 2
      - name: 定时任务
        url: /ruoyi-job/v3/api-docs?group=default
        service-name: ruoyi-job
        context-path: /ruoyi-job
        order: 3
2
3
4
5
6
7
8
9
10
11
12
13
14
15
16
17
18
19
20
21
22
因为是通过配置方式,原有的SpringDocConfig.java可以删除。
swagger方式,ruoyi-cloud版本 < 3.6.4 使用
1、在ruoyi-gateway网关模块下,把knife4j依赖资源引入
<!-- knife4j -->
<dependency>
	<groupId>com.github.xiaoymin</groupId>
	<artifactId>knife4j-spring-ui</artifactId>
	<version>3.0.3</version>
</dependency>
<dependency>
	<groupId>com.github.xiaoymin</groupId>
	<artifactId>knife4j-spring-boot-starter</artifactId>
	<version>3.0.3</version>
</dependency>
2
3
4
5
6
7
8
9
10
11
2、在ruoyi-common-swagger系统接口模块下,把knife4j依赖资源引入
<!-- knife4j -->
<dependency>
	<groupId>com.github.xiaoymin</groupId>
	<artifactId>knife4j-spring-boot-starter</artifactId>
	<version>3.0.3</version>
</dependency>
2
3
4
5
6
3、在其他ruoyi-xxxx-xxxx服务下,把ruoyi-common-swagger依赖资源引入
<!-- RuoYi Common Swagger -->
<dependency>
	<groupId>com.ruoyi</groupId>
	<artifactId>ruoyi-common-swagger</artifactId>
</dependency>
2
3
4
5
4、在SwaggerProvider.java的类注解追加@Primary
5、测试验证
访问http://{ip}:{port}/doc.html地址,出现如下图表示成功。

swagger方式重复依赖剔除
在ruoyi-common-swagger引用knife4j-spring-boot-starter依赖,其中的springfox-swagger2依赖可以删除。
在ruoyi-gateway引用knife4j-spring-ui、knife4j-spring-boot-starter依赖,其中的springfox-swagger-ui、springfox-swagger2依赖可以删除。